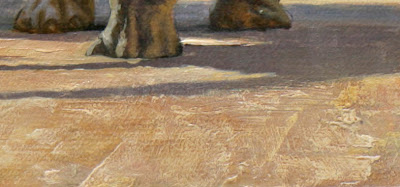
Rembrandt was a master at using impasto texture in the light areas of the picture, such as a necklace, a nose, or a collar. He used two devices to accentuate an area of impasto: “glazing in the pits” and “top-dragging.”
 Glazing in the pits means dropping pigment into the hollows, nooks, and crannies of your impastos. You can see it here in the foreground of the painting “Market Square.” To do this, build up your impastos either with acrylic modeling paste (always before using the oil at all--never use acrylic over oil) or with oil paint mixed with a little cobalt drier to help it set up.
When it is completely dry, you can quickly glaze a thin layer of raw or burnt umber thinned down with turpentine. Most of it will sink naturally into the pits.
When that layer is dry, you can lift off the hint of the umber layer from the tops by using a smooth cotton rag with just a hint of turpentine. This will take away the glaze from the tops but leave it in the pits. But don’t try either of those last steps unless the surface is bone dry.
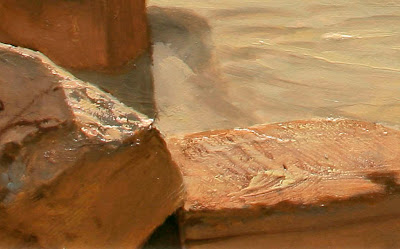
 Glazing in the pits helped accentuate the texture on the rock on the right, above, a detail of "Desert Crossing" from Dinotopia: Journey to Chandara. These impastos were pretextured with modeling paste, and photographed a special way to bring out the 3-D quality.
The rock on the left is an example of top-dragging. To do this, I first painted the stone a bit lower in value over a pretextured base. When that was dry, I loaded a bristle brush with thick, light paint and dragged it over the base, allowing the the paint to come off on the top of the little mountains of impastos. In a couple of quick strokes, you can achieve a random quality of rock texture without a lot of fussy rendering.
-------
Paint Texture
Paint Texture, Part 1
Paint Texture, Part 2
Paint Texture, Part 3

I can't state enough how much I love your blog. These little tips are invaluable. I paint pretty much every day but never actually thought of using this impasto technique for texture for light or half light instead of full rendering. Obviously I need to study some of the great painters a little more. Reminds me when I first learned the importance of using value.
ReplyDeleteThank you.
i have to echo Chris. i love your blog too! you explain so well and so simply very important bits of info with great visual examples. you're an awesome teacher. thanks so much!
ReplyDeleteAh, so THAT'S how it's done! I always wondered about that- Was it intentional, or just old dirt and varnish that built up? It's tips like these that I wouldn't even think of crossing my mind...Thank You!
ReplyDeleteJames,
ReplyDeleteI actually tried the same thing with a glaze of raw umber some months ago. I tried to rub it off the impasto ridges while the glaze was still wet though, and it worked fairly well. Some other artists I know recommend scraping the ridges with a razor blade - haven't tried that yet.
I attempted what you call top-dragging but I did it before the paint was dry - I'll have to try your way.
I've also had success using a couple resinous mediums (maroger and roberson's) that give the paint a great "short" feeling. Does liquin work that way for you?
I became sort-of a Rembrandt fanatic this past year and was really in to studying his work, so I've got lots of nice books on his technique. If you're interested in his paint effects and don't already own them there are a couple books by Ernst van de Wetering that are superb.
The best one is "The Painter at Work" - this is the best one I've found on Rembrandt's paint handling. His book "Quest of a Genius" is also good (I've got a new one) but must be in short supply because Amazon currently list it at $149 (ouch).
Thanks again for the great insight into your methods.
Ron