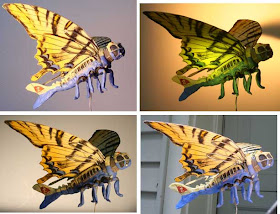
 Here are four lighting ideas. The last one is shot outdoors in overcast light with an incandescent light filling the shadows. The other three are shot indoors with two lights of contrasting color temperature.
 Number two uses a technique called light painting, where I handheld a small LED light wrapped in an amber gel, sweeping it across a small area during a four second time exposure.
In night scenes, localized lighting that falls off rapidly away from the source can be an effective way to suggest scale.
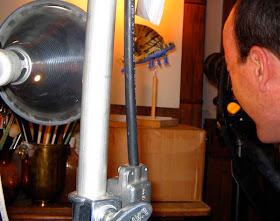
 All of these are shot with a self-timered Canon Digital Rebel single lens reflex camera on a tripod. The pole in the middle is supporting a Mole-Richardson Tweenie II Solarspot (about three feet above the top of the photo), which is washing the back wall with orange light.
Now I’m ready to move ahead with the line drawing.
Part 1: Initial Sketches
Part 2: Researching Insect Flight
Part 3: Maquette
Part 7: The Painting

the shooting process of the second one is very interesting! it make the lepidopter bigger than in the other shots. it's a quite mystical lighting, love it!
ReplyDeletekeep up the good wokr!
Hey James,
ReplyDeleteThese tutorials are very cool, cant wait to see the next post. I love seeing all the steps.
Best Jason
One of the thinks I notice is the potentially dramatic shadow of the wing on the wall in the background in the top right picture. If you image that shadow to be on a building...
ReplyDeleteIt has a "The arrival" kind of effect.
But could feel to treatening for the scene.
I'm getting a feeling of guiding lights on a runway in picture 2- I see what you mean about the feeling of scale. Thanks for sharing the process!
ReplyDeleteSometimes I have experimented with lights and composition using a 3D software (the free modeler Blender). It's probably less fun than your approach, but quite powerful. It's very valuable when planning complex scenes. Quite often you need an accurate perspective, and a nice composition (the 2D projection) at the same time. This usually implies some "trials and errors". The 3D scene in a modeler, however, is intrinsically correct, so you can concentrate on the resulting 2D composition.
ReplyDeleteOf course you get a 2D rendering instead of a 3D model, which could lead to a more literal, less creative copy - but that's up to you, anyway.
Cool -- the light painting technique is very effective.
ReplyDeleteTo take it a step further you could take a second photo (Keeping the camera and model locked in the same position) with the LED wrapped in a blue gel and "paint" it across the top of the maquette. Then you could combine the photos in Photoshop and "dial" up or down the intensity of the individual lights. By isolating the light passes you wouldn't have to worry about setting up a bunch little gobos to block the light.
They used to do a similar thing when shooting the original Star Wars space ships: They'd make separate passes for a main light, a rim light and then use longer exposures for the internal LED lights built into the model. But in that case, the camera would be moving a frame at a time on a motion control rig programmed to repeat the move exactly the same, time after time.
It's striking how the lighting method used in #2 changes the blues of the body and legs into greens.
ReplyDeleteA interesting process.
ReplyDeleteDo not know if you have seen any photos of The Harrier Jump jet which was for a long time the main aircraft or British aircraft carriers.
I believe the Americans brought up the
rights to develop it further...it is just that the images remind me of the Harrier.