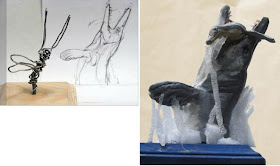
On the far left is an aluminum wire armature on a threaded bolt. The bolt is screwed into a pine base and bent to the side. The wire armature, loose as it is, fits within the measurements of the adjacent line drawing. It’s smeared with two-part quick-dry epoxy to hold it together.
To the right is the finished Sculpey maquette, painted with acrylic. The streams of water are represented by strips of flexible packaging foam hot glued to the fins.

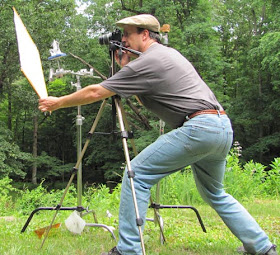
I tried photographing the maquette in a variety of natural lighting conditions. Real outdoor light is almost always better than artificial illumination. The maquette is held in position on a C-stand, while I hold a white backdrop behind it. The digital SLR camera is mounted on a tripod, set for a small aperture to get maximum depth of field.

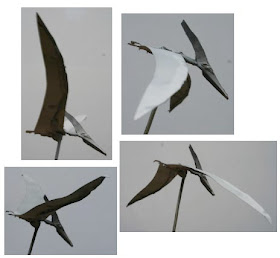
I also made a 2D-3D maquette of the Pteranodons, which made the foreshortening a lot easier to imagine. A little maquette like this, since it has bones made of aluminum wire, can be reused and repositioned many times for future illustrations.
------
Sea Monster, Part 2
Sea Monster, Part 1
2D to 3D Maquette on GJ

Just an incredible method for obtaining references :)
ReplyDeleteThese glimpses into your process are fascinating, James!
ReplyDeletePlease compile them all into a book and then sell it to me.
Its really interesting to see your process again and again. It is very helpfull and inspiring.
ReplyDeleteThanks --great post.
ReplyDelete"It’s smeared with two-part quick-dry epoxy to hold it together."
Do you do this to stiffen the armature wire so it doesn't deform while your sculpting?
Daroo, no, I meant to say that I twirled the wire together where I wanted it, then smeared the armature with glue to hold the loose coils together.
ReplyDeleteAfter reading Imaginative Realism, I made a reference maquette for a strange-looking alien character in a comic book I was drawing. Even though I don't look at the maquette much anymore, and it is falling apart (it's not as well made as this mosasaur), simply the experience of sculpting was a huge help. It forced me to understand how a creature that began as a doodle would look in three dimensions, from different angles, when lit different ways, etc.
ReplyDeleteI have a question about making maquettes out of sculpy. When you made this one did you stick the whole thing in the oven, wood and all?
ReplyDeleteCody, yes, I put the whole thing, wood and all in the oven. I used to be nervous it would burn, so I'd soak the wood in water. But I know wood doesn't ignite until it gets over 400 degrees, and the Sculpey bakes at 275.
ReplyDelete