During this "Watercolor Week," I thought I would share just two of the 5-minute demo segments (Tortoise and Zouave) from the new watercolor video "Watercolor in the Wild." If you have purchased the DVD or download, thanks!—and don't worry: I'll hold back the four remaining longer segments (Miniature Horse, Carriage House, Greenhouse, and Churchyard)—which actually translates to more than 3/4 of the running time that you can see only if you purchase the video.
Sharing these sample clips on the blog gives me a chance to amplify them with closeups, and it gives everyone an opportunity to comment and ask questions so that these blog posts can be more interactive.

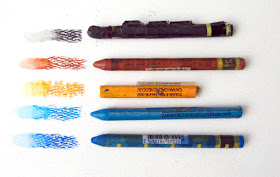
For example, yesterday in the comments after the art supply list, Irene mentioned that you can get woodless watercolor pigment sticks or crayons, something I didn't discuss in the video. Thanks, Irene. As she indicated, Derwent makes Aquatone Woodless Pencils
These are shorter than the colored pencils and a bit softer, like crayons. Lyra's

Whether you use the wood pencil or the crayon version of these water-soluble drawing tools, they offer three big advantages over a pure watercolor rendering.
First off, they're a fast way to get texture. I used the colored pencil dry over the first base layer of watercolor.
Secondly, as you can see in the little round scales above, you can add water later to soften or blend the pencil. That's how I made those smooth dots: just a touch of water on each. And I used the water brush to group them together into a shadow, as along the right side of the form.
The third virtue of the colored pencils is that you can draw lines with exactly the color you want. You're not limited to black or brown, as with most pen lines. In the case of the growth rings on the shell, the lines looked gray in the upper areas, and they got darker on the sides. So I switched the color of the pencils as I went down the side of the shell.

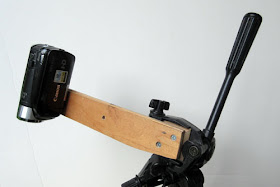
Some of you asked how I shot the video while doing the drawing. For the tortoise segment, I used one video camera and one tripod. I held the camera off to the side with a "camera extension bar" that I made out of 1/4 inch plywood. This holds the camera over my lap without getting in the way too much. I also used this for shooting the miniature horse sequence.
The camera extension bar has a wooden wedge on the side that fits the quick release slot of my tripod.
To learn more about the 72-minute video "Watercolor in the Wild":
HD download: (Credit Card)
HD download: (Paypal) buy
DVD: (NTSC, Region 1)
GJ Blog Post about Watercolor Materials


I was trying to decide today whether to order the DVD or go for the cheaper download. After watching yesterday's materials video clip, you flipped briefly through your sketchbook and I noticed several beautiful studies I've never seen before on your blog. You mentioned earlier the DVD includes a fairly large number of studies as a bonus. Hoping some of those examples are included on the DVD. Getting the additional artwork to peruse makes the increased price for the DVD worth it in my mind. Looking forward to receiving my DVD.
ReplyDeleteFantastic James, I'm going to physically force my digital students to buy this and glue their eyes open for the duration :)
ReplyDeleteJames,
ReplyDeleteEnjoyed this and the portrait segment. (We used to live walking distance from Colonial Williamsburg, so the portrait one really took me back.) Looking forward to getting the full DVD.
In this segment you mention that you draw the outlines without measurement or construction lines, just eyeballing the dimensions. I think this is a valuable piece of information, because there seem to be instructors out there who feel that it's impossible to learn how to do that! Even Harold Speed, in his book on drawing, advises the student to make a transparent grid for measuring, and he asserts that it will probably be a long time before you are able to do without one.
My question is: Do you have any advice on how an art student should go about training himself/herself to eyeball dimensions and sketch them quickly?
Thanks,
Dan
Dan, good question. I think the answer is that when sketching outdoors under the pressure and urgency of changing subjects, you process the same steps you would follow in controlled conditions, but at a much faster pace.
ReplyDeleteSo the internal brain chatter might be "slopes" -- "negative shapes" -- "vertical alignments" -- "cylinders" -- "drawthrough" in a kind of rapid fire visual processing. It may not be as accurate as you could get by doing it all methodically, but it's the best thing under the circumstance.
Bottom line: it's like basketball-- learn all the academic stuff, but go outdoors to apply it in pressure situations.
Thanks for the answer, James. Very interesting.
ReplyDeleteWhen I was a musician, some of us had a mantra about learning to play fast passages (64th notes, etc.) Young players (especially on guitar, and especially back in the late '80s) were enamored with the idea of playing fast to show off. We "old pros" used to repeat the mantra: "Speed is the byproduct of accuracy." The meaning was essentially: "Concentrate on learning to play cleanly and with good timing, and the speed will come naturally. Concentrate on trying to play fast, and you'll just get sloppy."
Interestingly, here you almost seem to be saying (if I'm interpreting you aright): "Accuracy is the byproduct of speed." In other words, it sounds like you're suggesting that the way to learn to eyeball proportions with accuracy is to force yourself to work quickly, under pressure, and without time for more careful measurements. In those circumstances, the natural "feedback loop" of learning from your mistakes might teach you to achieve a level of accuracy without resorting to careful measurement.
At any rate, in music, we'd practice complicated runs at, say, half speed, with a metronome, focusing on precise technique, fingering, and accurate timing. If you do that for long enough, you find that you can speed it up and play it cleanly. I was wondering if there was any analogy to that in the world of visual art.
Dan, i think he is saying, "accuracy is the byproduct of a lot of practice"..... In high school I attended a lot of punk rock shows... I drew a lot of fast studies because the musicians moved around a lot, but often returned to the same poses. It made me very fast and while I rarely had anything decent to show out of the sketchbook, I could sit down later and draw a decent figure. Drawing from life is the equivalent of playing scales - do it over and over again and the information will be accessible when doing full complete works. Work done in the field is rarely the work I want to show off later.
ReplyDeleteDan and Katana, yes, you've both described it from really interesting angles. I suppose that with a moving subject, we have to redefine accuracy, because it's not like a photographic capture or what you'd do in a controlled academic environment.
ReplyDeleteInstead, you're quickly absorbing and internalizing the structure of the subject and recreating it on the page. The result may or may not work, but it will capture aspects of truth that might elude a camera.
James and Katana,
ReplyDeleteThanks for the insights. No doubt improvement comes with practice, but then there is the question of what kind of practice is most effective at improving certain skills.
I think of running scales as purely technical practice in music, and to me it seems more analogous to practicing specific lines and strokes (for example, as Arthur Guptill recommends in his book on rendering in pen and ink). Quick sketching on the spot, with moving subjects, changing conditions, etc., seems more analogous to improvisation, like sitting in at a blues jam, where you don't have time to think; you just have to play and try to keep up.
In music, each of these will develop certain skills, and both should be done, definitely. But supposing I met a beginner at a blues jam, and she was asking me, "How do you do that--just make up arrangements on the spot like that?" I think I would most likely have to say that it began with all that technical practice I did before I ever went to my first blues jam. To be able to improvise freely requires first that your scales, chords, and whatnot are committed to muscle memory and deeply ingrained with your "ear," which can't necessarily be accomplished by just going out there and jumping in and improvising.
In music, lots of people wanted to jump in and start playing, while comparatively few wanted to put in the long hours of technical practice that led to proficiency. This led to those truisms like, "Speed is the byproduct of accuracy." Pros said those things to aspiring young musicians to try to instill in them the idea that the "boring" parts like timing and technique always came before the "flashy" parts like speed and virtuosity.
So my original post was kind of like the youngster at the blues jam; Here I am asking the "old pro" what it takes to be able to just draw freely like that. I'm wondering if the answers are similar, if any part of it is "practice the technical rudiments." Interestingly, that answer seems rare among artists. That, to me, is a very interesting phenomenon.
Is the answer different because most artists got all their technical rudiments by tracing comics as children? Or did they absorb them along the way? Or is the whole thing just different in visual art than it is in music?
For my part, as a student, I find putting the cart before the horse to be uncomfortable and unproductive. I'd rather focus on developing something that's within my reach at my current level of ability than just "fail" thousands of times at trying to do something I don't have the skills to do, while hoping I absorb the skills along the way.
Anyway, perhaps we've exhausted this subject, but these are the thoughts I have about it, coming from an accomplished pro at music who is a complete neophyte at drawing.
Thanks again,
Dan
I've just purchased your video and the bonus video. I've only watched them twice but I love them. The filmography is a good as the art advice. Thanks.
ReplyDeleteI do have one question, however. You say you use Higgins Eternal for your black ink and you use a 'blue' ink. It looks more like a blue-black ink but in any case, you never mentioned what it was. It blends so well with Higgins that I'd like to try it. What brand/color is it?
Cheers --- Larry
Remember Gilda Radner's Roseanne Roseannadanna character? I feel like here and have to say, "Nevermind!"
ReplyDeleteI found the answer to the blue ink question by going through your blog posts. Sheaffer Skrip Blue is still available, I think. They changed the bottle since my days of using it in high school but I have a bottle of it. Thanks.
Have a nice day -- Larry
Thanks, Larry. I'm using a very old bottle of blue-black fountain ink made by Skrip. The Skrip brand still exists, but I haven't tried out any of their inks to see if they match the stuff I have. As you noticed, it's quite grayed down. Of course, you can mix your own ideal color out of multiple colors of fountain inks (plus water if you want it lighter), preferably using inks by the same manufacturer.
ReplyDelete