


One blog reader, who is an artist and a builder with a form of Muscular Dystrophy said, "It's difficult to find art manufacturers that make lightweight equipment for people with disabilities."
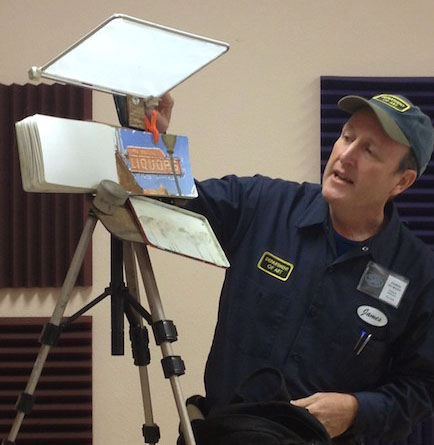
Here's how my easel looked when I set it up to show some workshop students. It fits on a camera tripod, which allows you to control the height and slope of the painting surface.
The white thing is a DIY nylon diffuser to shield direct sun or dappled light.
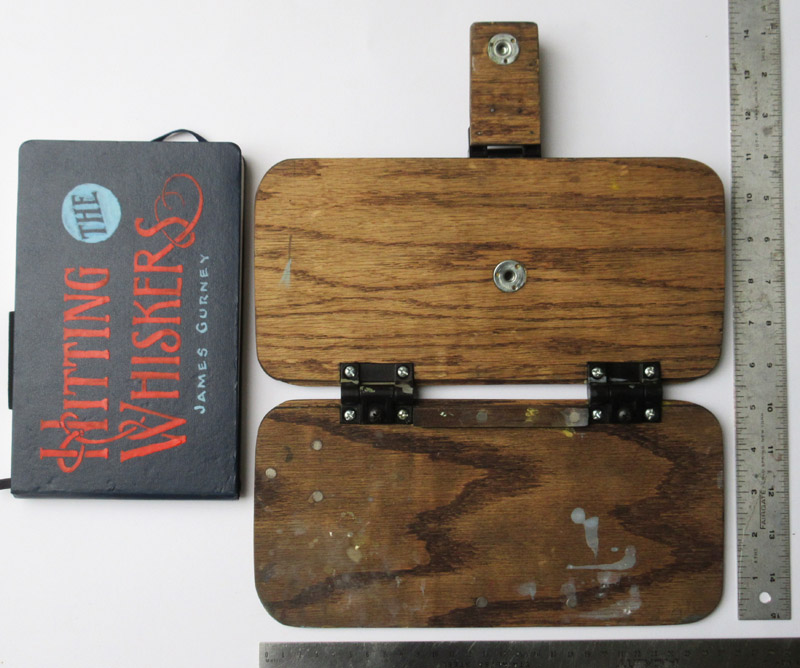
Here are the front surfaces (the ones facing me as I work) laid out flat. Each panel is 5.25 inches (13.3cm) by 11 inches (28cm). The panels are 1/4 inch oak plywood finished with Tung oil.
The long dimension of each panel only needs to be about 3 inches wider than the sketchbook in order to support it when open flat and clipped. The whole thing is small enough to fit into my belt pouch when it's folded.
The palette panel (the one on the left in the photo above) has recessed Neodymium magnets to hold mixing tray or watercolor set. The triangle of magnets matches corresponding magnets on the base of the water cup.

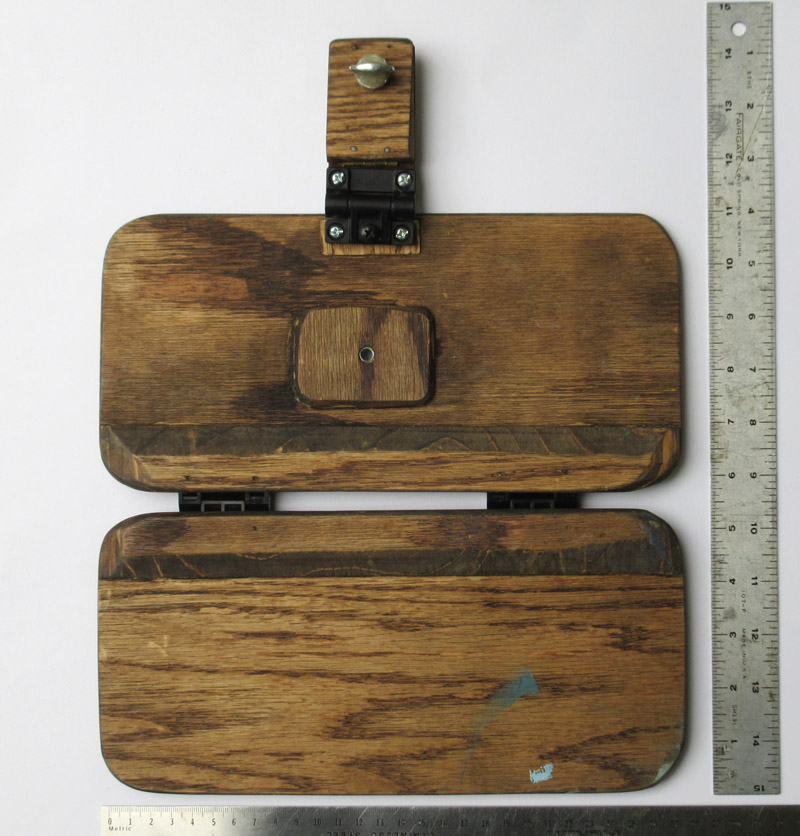
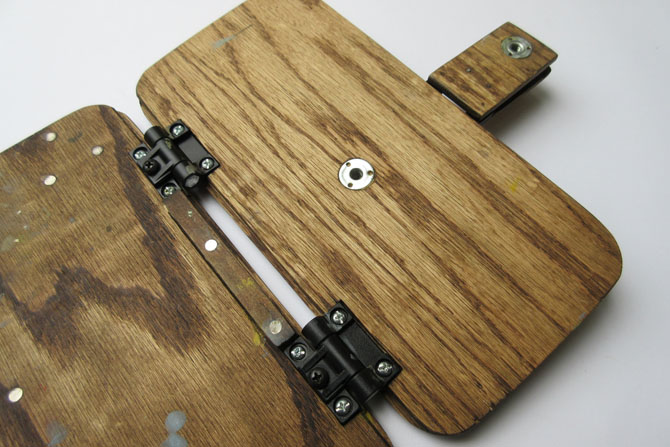
Here's the back laid out flat. The support point is positioned close to the center of the sketchbook page on the other side. The closer it is to that point, the less the whole rig will wobble when pushed with the brush, pencil, or hand.

The diffuser gripper is made of two pieces of plywood with a T-nut on one side and a thumb screw on the other. The two pieces are held together with a hinge and grooved to hold the diffuser bar. The wedge mounting base allows the gripper bar to fold down flat when not in use.

Here it is set up with a camera extension bar coming from a second tripod. I just wrote an article for International Artist magazine about how to shoot and edit video art tutorials.

This sketch easel can be used not just for sketchbooks, but also for small paintings on panels. Here I'm working in casein on an 8x10 panel clipped to the easel.
 Please send me photos with captions of your own DIY sketch easel. My design uses some of the refinements you came up with in the last round (see post called Your DIY Sketchbook Pochades).
I'll award a prize of a "Department of Art" embroidered patch to my favorite submission.
------
Suggested parts:Tee Nut
Southco adjustable friction hinge
Nalgene 2-Ounce Jar
1/4 x 1/16 inch Neodymium Magnets
Tung oil
Tripods: Vista Explorer 60-Inch or Velbon Sherpa 200 Tripod
Diffuser: White Rip-Stop Nylon Fabric
30 comments:
Thank you!
Hey James,
Thank you, these photos of your palette are great. Ive got some good ideas brewing for a lightweight palette. I'm looking forward to seeing what others come up with as well.
Your sketch easel is so well-thought-out, and the oak surface makes it really handsome. Maybe your readers would also be interested in a couple of homemade sighting devices. Drawing proportions accurately from observation is frustrating for me, having been better at it long ago after a LOT of life drawing classes.
I'd never cared for the simplest way, the pencil method, because I didn't feel sure that my arm, pencil and head were placed consistently for each measurement. So I went Googling for a method that'd ensure a consistent distance from the measuring tool to the eye. There are some excellent ideas on the following sketching forum thread, starting with Antonio Lopez Garcia's measuring compass support:
... http://www.sketching.cc/forum3/viewtopic.php?f=1&t=1930
(He rests the near end against his cheekbone.) And concluding with a C-Thru ruler with a bubble level glued to the middle, and attached around the user's neck with a lanyard:
... http://www.sketching.cc/forum3/viewtopic.php?f=1&t=1930&start=15
You can press a compass against the ruler, extending the lanyard in front of you, and then transfer the measurement directly to the drawing like Garcia.
Being SO rusty, and impatient, I wouldn't mind tracing initial contours onto a transparent grid (mounted on a lanyard?) instead of using ruler/compass measurements, but you would have to transfer the traced contours to your paper and maybe wouldn't save much time. Dunno.
Hey James,
Whats the deadline for submitting?
Nancy, thanks. I like the ruler and lanyard ideas for fixing the distance from the eye. I'll have to see if I can adapt that to my prototype for the grid system.
Erc, why don't we say a month, how about November 15? Hopefully that will give everyone enough time to build their rig and try it out.
James, that diffuser is a very good idea. I invariably find that the view I wish to paint means standing with the paper in full sun, which isn't ideal.
Thanks for that.
James,
What issue of International Artist Magazine will that tutorial show up in? For that matter, do you have a list of somewhere online of all the issues that you have appeared in?
Thanks,
Pat Bollin
Pat, the article on how to video your art tutorials will come out in the December/Jan issue. I haven't put out a list of all the topics I've covered, but that's a good idea.
Hello James- that diffuser looks like a handy addition when you don't want to lug an umbrella around. I am trying to add it to my homemade pochade setup for oil painting; if you are interested the details are here:
http://judypalermo.blogspot.com/2014/09/my-homemade-plein-air-gear.html
Many thanks for all the good info.
Hi James
Can you please tell me how the diffuser is constructed and where you purchased the materials. Also I'm trying to figure out the purpose of the (2) wood strips you glue to the backside of the Easel. Thanks, Eric
Hi James,
I'm looking for a little more info on how the diffuser is constructed and where to purchase the diffuser frame materials. Also I can't figure out the purpose of the two wooden strips that are glued to the backside of the easel. thanks so much! Eric
Eric, I'd be glad to, in fact I'm working on a video about the making of both the diffuser and my version of the easel. But if you don't mind, it might take a month or two before I get those videos shot, edited, and released.
I'm in the process of making this from your specifications - thank you for posting them - the one thing you don't mention is, how did you make the frame for the diffuser?
Lindsay, the diffuser frame is an aluminum frame from a Pendaflex hanging file folder system—tech that's about 20 years obsolete now.
https://www.facebook.com/photo.php?fbid=254495438220093&set=pcb.254496198220017&type=3&theater
Dear James, would you please provide a link on where I can find your article on shooting video tutorials and camera setup, please! Many thanks again, Armella
Journal, check out this link for more about videoing your art:
http://gurneyjourney.blogspot.com/2014/11/how-to-video-your-art-part-1-camera.html
....and here's part 2 about microphones and editing:
http://gurneyjourney.blogspot.com/2015/01/how-to-video-your-art-microphones.html
Those round tee nuts sell in a pack of 15 for $24 which is kind of steep for me. Does anyone reading this have just 1 or 2 extra that they wouldn't mind selling for a couple bucks?
You know, no sooner did I post this, when I stopped by Tractor Supply Co, and saw them for 99¢, a la carte! So please disregard the previous post!
Just found this and am in the process of making one for my sketchbook. Up until now I've made do with setting my kit up on my lap or nearby surfaces, with mixed results. Thank you so much, James Gurney, for your inspiring posts. I love your work!
I just purchased the adjustable torque hinges that you recommended. Maybe I didn't understand its purpose. I've tried contacting the manufacturer but they are not answering my questions. (I think their English is limited.) Once the hinge is set in a position by tightening the screw, the hinge can not move in any direction. So in order to open and close the easel you need to carry a phillips head screw driver around with you. Is that correct? If so, My lightweight easel just got heavier to carry.
I just purchased the adjustable torque hinges that you recommended. Maybe I didn't understand its purpose. I've tried contacting the manufacturer but they are not answering my questions. (I think their English is limited.) Once the hinge is set in a position by tightening the screw, the hinge can not move in any direction. So in order to open and close the easel you need to carry a phillips head screw driver around with you. Is that correct? If so, My lightweight easel just got heavier to carry.
Linda, You should be able to loosen the screw and that makes the hinge move more easily. It should hold its angle but not be stiff to change.
I find that the Pend-A-Flex metal frame is a bit heavy for my easel - I can't get the clap tight enough and it fell off 3 times while painting the other day. Has anyone found a lighter-weight frame that can be used in place of the flex frame?
James,
I'm so thankful for the resources you share. I made a sketch easel based on your model and took it with me to Guatemala. Here is a post with the work that came from it. https://www.stevethomason.net/2019/08/31/plen-air-painting-in-guatemala/
Please keep up your wonderful generosity. I've learned so much from you.
James,
Thank you so much for sharing your knowledge so generously. I made a sketch easel based on your model and took it to Guatemala last August. Here are the pieces that came from it https://www.stevethomason.net/2019/08/31/plen-air-painting-in-guatemala/
I have learned so much from you. Please keep giving. You're amazing.
I agree wholeheartedly with the other comments, thank you so much. But... do you ever tilt your easel so that it’s closer to flat for watercolour? I’m really curious if you have or not. Did you find it useful or not? Thanks again James!
Post a Comment