Monday, December 31, 2007

Water Reflections, Part 3

This is the last of a three-part series on water reflections. Reflections appear spontaneous and gestural, but they also follow definite laws.

Here’s a detail from a recent painting (page 31 of the new Dinotopia book), showing how an image is broken up by the wavelets. Edges with strong contrasts, like the brightly lit wall against the sky, or the dark boat hull, break up in a loose—but controlled—painterly way.

But subordinate edges, like the metal railings or the edge of the column, are blended and lost in the reflection. They might show up in a high-speed photo of the reflections (assuming the scene were real), but I don’t think the human eye would perceive them in real life.

In this plein-air painting in Mamaronek Harbor, I started with a warm underpainting and then laid down a light tone for the color of the reflected sky. Over this thinly painted but wet oil layer I added the calligraphic strokes of the reflections of the boat hulls.

This is a detail of the painting of Chandara from the new Dinotopia book. For a reflection like this, which follows the architecture very exactly, the perspective must be carefully constructed, even though the final reflections are painted quickly and gesturally.


The architectural forms in the reflection are drawn to the same vanishing points as the real forms in the scene. It’s not the same 2-D image inverted. That’s why the slope of the eves on the real projecting bay window (1) are different from the slope of the same forms in the reflection (2).

Perhaps there’s a broader lesson here about the artistic state of mind. I believe that the act of painting often consists of this strange combination of precision and freedom, accuracy and looseness. We need to think about physics and geometry, but at the same time, we have to surrender to an irrational impulse.

Sunday, December 30, 2007

Color: Warm and Cool

This is the second in a Sunday series on color. It introduces the most basic color relationship: warm and cool.


As I suggested 
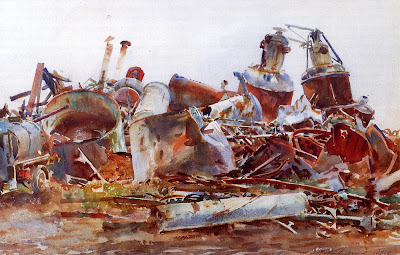
last time, most books or classes discuss color in an abstract, theoretical sense. But I’d like to concentrate on the pictorial application of color. Why, for example, did John Singer Sargent choose to emphasize those browns and blues in his plein-air painting of a wrecked sugar refinery, above? I'm sure if you had taken a color photo of the same subject, it would have looked nothing like this painting.


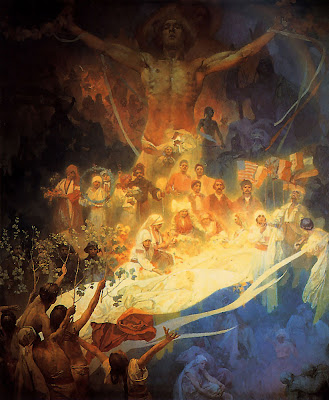
And why did Alphonse Mucha choose this particular blue and gold palette to express his deepest feelings about his homeland?

I’d rather give you useful tips about color that you can apply to your own pictures. So please forgive me if I don’t approach the subject comprehensively. Instead I’ll just fast-forward over the concepts that most of you are already familiar with.

Let’s assume that you already understand the foundation terms:
--the color wheel
--primaries and secondaries
--the concepts of hue, value, and saturation (aka chroma)
If you’re not sure about these ideas, you’ll find answers on Wikipedia or on the website Handprint (thorough and techical) or in most any book on color.


Here’s the color wheel I like to use. It has the various full-chroma hues arranged around the outside margin. Neutral gray is at the center. As each color approaches the center, the chroma decreases until it arrives at neutral gray.

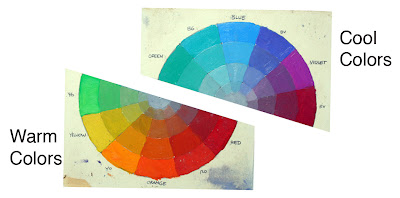
To get started, let’s take the color wheel and chop it in half. On the bottom half are all the warm colors: from yellow-greens, to oranges, reds. On the top half are the cool colors, the blue-greens, blues, and cool violets.

Someone might argue about where to divide the wheel. The greens and violets seem to have divided loyalties. But if you consider the “heads of the families,” blue and orange, there seems to be some basic psychological difference between them.


The cool colors seem to evoke feelings of winter, of night, of death and sleep. They remind us of quietness, restfulness, and calm.

The basic feelings suggested by the warm colors are completely different. We associate the warm colors with fire, sunlight and blood. (Above, The Burning of the Houses of Parliament, by J.M.W. Turner.) They make us think of energy and passion. Orange and yellow are ephemeral colors. We see them only fleetingly in nature: at sunsets, in flowers, or in autumn leaves.

This basic perception of the two families of color seems to be woven into the fabric of our human existence. The anthropologists Paul Kay and Brent Berlin have studied the evolution of color terms in languages around the world. In European languages we have about 11 or 12 basic terms to describe colors.

But some so-called “primitive” languages, like the New Guinean language Dani, have only two basic terms. Kay and Berlin write: “One of the two encompasses black, green, blue and other ‘cool’ colors; the other encompasses white, red, yellow and other ‘warm’ colors.” (Link for full story in Scientific American).

Primitive peoples didn’t have poor vision; far from it. But rather, anthropologists suggest that as language evolved, it developed its first word-concepts around the most psychologically important divisions or groupings.

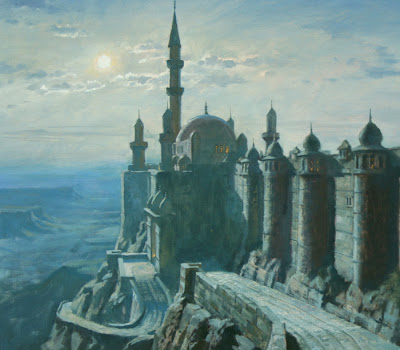
I think a lot about “warm and cool” when I’m painting. The moonlight painting of Khasra from Dinotopia shown earlier is painted with colors primarily from the cool side. I wanted to suggest mystery, calm, and night.

In a painting of one predominant family, an accent from the other side of the spectrum adds a lively contrast. Here’s a painting by Richard Parkes Bonington where he has enlivened his warm colors with a few accents of blue. Notice that there’s no green or red in this one. It’s painted almost entirely with blue and orange in various value ranges and degrees of saturation (mostly its duller cousins in the ochre and sienna ranges).


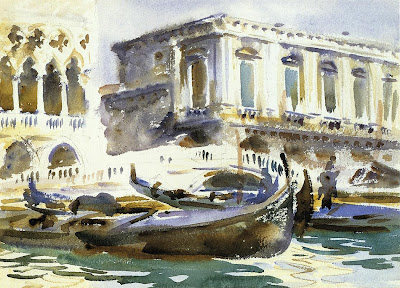
Warm and cool colors bring each other to life by these adjacent contrasts. This quick sketch of Venice by Sargent has a lot of areas where warm and cool are played against each other.

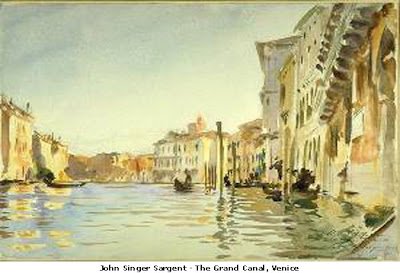
Many of Sargent’s best watercolors were painted primarily with two colors, probably ultramarine blue and raw sienna, exploring the dance between the cool and the warm. He must have been looking at other colors, like red and green, in the scene before him, but he was ignoring them.

Please let me know if this kind of stuff is useful, and if I'm pitching it to the right level.

Saturday, December 29, 2007

Water Reflections, Part 2

Yesterday we took a look at how light tones are reflected in still water. The dark tones in the scene—trees and such—are a different story.

The way they reflect in water depends on two factors. One is the amount of silt or sediment in the water, and the other is the amount of light shining into the water.


If the water is dirty, and if that dirty water is directly illuminated, the darks will get progressively lighter (and usually browner), as they did in this on-the-spot oil sketch of the River Suir in Limerick, Ireland, after a heavy rain. Reflections are at their purest only at dusk, when no direct light is touching the water. Muddy water in those conditions will reflect just as well as clear water.

The reflections differ from the source in another way. In the reflection, the image is distorted by the wavelets on the water. Even if the wind is very light, tiny waves break up the reflection, and dissolve horizontal lines. Vertical lines, though, are still preserved in the reflection.

For example, this detail is from a scene in Journey to Chandara. It shows a lake in the desert at dusk reflecting a seated statue. The horizontal lines of the base of the statue are not reflected, but the verticals appear quite clearly.

Let's do a reality check on that last point. In this photo of fishing boats in a harbor, you can see how reflections favor verticals over horizontals. In the reflection the lines of the gunwales quickly become indistinct, while even the finest masts and poles are still crisp and sharp.

In the words of John Ruskin, who wrote eloquently on this subject in the early 19th Century, "All motion in water elongates reflections, and throws them into confused vertical lines."

On Monday, in the final installment on water reflections, we’ll take a look at how reflections break up images in water that's a little more disturbed.

Friday, December 28, 2007

Water Reflections, Part 1

When a scene is reflected in water, it appears almost like an inverted mirror image.

Almost. But the reflection is different in a few important ways. First off, the light tones that you see in the scene above the water will appear a little darker in the reflection. These light tones might be clouds in the sky, a white house, or light-colored leaves on riverside plants.

The reason these light tones appear a little darker in the reflection is that some of the light penetrates into the water, rather than bouncing off the surface. This light is the very same light that you would see if you were snorkeling under the surface. If water were a perfect mirror, fish would live in pitch darkness! Because each parcel of light is reduced by the amount of light that is diverted into the water, the amount of light reflected is also reduced.


Note how the colors of both the blue sky and the orange bush darken when they're reflected in this wintry stream.

Water approaches the reflectivity of a perfect mirror only when you’re looking straight across it at a very shallow angle. As the steepness of the angle of reflection increases, the percentage of light entering the water also increases. If you are looking steeply down onto the surface of the water, not much light from the sky will be reflected. Think how dark the water in a lake or ocean appears when you look straight down into it from the side of a boat.


This light-eating phenomenon (called refraction, as opposed to reflection) came into play in this painting of a white resort perched above a lake. I was looking downward on the water, and was surprised how poorly the water reflected the white rocks along the lake's edge and the light stones on the building. I painted it the way I saw it, but it still looks strange to me.

As a reality check, here's a photo of the same place, shot with a steep downward angle. It shows the same effect, with most of the light tones disappearing into the water, rather than reflecting off its surface..

Thursday, December 27, 2007

Seven Flags Deconstructed

Thanks for the comments to yesterday’s quiz. You all explained flag behavior better than I could. The seven flags are all variations on the “wavy ribbon” idea, which is how we think flags should look.

In fairness, there’s nothing wrong with this way of drawing flags—if your goal is to represent the mental image of a flag. A cartoonist is usually after the mental image, not reality. It’s also a good way to represent a flag if you want to show the flag's graphic design clearly.


But if your goal is realism, it’s worth observing that flags never actually appear with undulating folds parallel to the flagpole. Instead, as many of you pointed out, a set of folds radiates diagonally downward from the upper point of support.

I was unaware of this principle until a day in 1995 when I was stuck in rest stop during a long bus trip through the midlands of England. There was nothing to do but sketch and nothing to sketch but a flag. I drew a page of variations as the wind changed from a zephyr to a stiff breeze.

Here are some YouTube videos, which show waving flags better than my sketches.
Medium size flag in diminishing wind: Link
Small flag in stronger wind: Link
Small flag in heavy wind Link
Big flag in heavy wind: Link ; (In this last one, the diagonal rule breaks down a bit, and the wrinkles are more complex billows. They actually start to look a bit like the flag pictures from China and France, above. I have a feeling the math behind all this is pretty complex.)

Perhaps one of our CG animation friends might be willing to say a few words about the challenges involved in modeling this kind of action in 3D on a computer.

Well, it's hard to pick. The grand prize has to go to the first Anonymous (theartistsmith.com) who got the basic answer right away. The next four runners up who really described the action are: Kevin H, Dan G., Orlando M., and Meredith D. But I'm going to give the last runner up prize to Big E, who expressed the larger truth that there's no single correct way to represent reality; it depends what you want to communicate. If you’d like to collect your prizes, please email your mailing address to me at jgurneyart@yahoo.com.

Wednesday, December 26, 2007

Seven Flags


What is wrong with these flags? If you know, please leave a comment today before midnight, eastern time in USA.

I’ll post the results tomorrow. The person with the best answer can have their choice of a free signed Dinotopia art print. Five runners-up will be eligible to receive a free doorknob hanger, signed bookplate, and bookmark.

Tuesday, December 25, 2007

Santa Claus


Here’s my rendition of the Man in Red. The original is in oil, 36x24 inches.

Doing a portrait of Santa Claus is a bit like painting Abe Lincoln or George Washington. You can’t monkey around with the archetype too much. At least that’s what I figured. I stuck pretty close to the Sundblom-standard, with maybe just a bit of “biker-dude” mixed in.

To all the readers of this blog, I wish you good tidings for this festive season. May it bring to you and to all of us a rebirth of hope and a triumph of innocence.

Monday, December 24, 2007

Invite / Delight

Enduring masterpieces have two qualities. They INVITE and they DELIGHT.


INVITE
A picture invites us by presenting a clear effect at a glance. It grabs us from across a room. The composition makes a definite statement. The lighting conveys an unmistakable mood.


The basic idea or situation of the picture must be evident right away. It must be understandable without too much explanation. Avoid concepts that are too intellectual. Avoid illustrations that depend entirely on an extrinsic narrative, unless it is universally recognized. People are easily embarrassed if they cannot begin to respond to a picture right away.


At the same time most masterpieces raise a question, suggest a mystery, leave a doubt, or present an unresolved conflict.

DELIGHT
While a strong singular impact invites us into a picture, what really captivates us are the delights that we discover after the first impression.


“Delight” doesn’t mean the picture is necessarily cheery and optimistic; even if the story is horrifying or foreboding, we find a strange pleasure in exploring the sources and consequences of the tragedy. For this reason, we're usually more interested in the moment just before or just after the peak of the action.


We like pictures that let us discover things on our own. We connect with a picture when we find subtle, hidden elements.


We want to study a picture to become familiar with the supporting characters or details. We want to discover hints of a story beyond the obvious. If this is done well, we will say, “I see something new every time I look at that picture.”


When a picture contains human figures, we automatically identify with them. The human factor helps us live inside the scene. We respond to real people in real situations. Poses must be based on life, even if they are idealized.


Emotions, such as humor or pathos, must be sincerely felt by the artist, and transmitted by every pictorial means possible.


In landscape, the human factor can be the mere suggestion of a human presence, such as a road or a tree stump.

Next time you’re planning a picture, let those words dance in your head: “invite, delight.”

Sunday, December 23, 2007

Color Sundays

Every Sunday over the next few months, I’ll be presenting ideas about color. Color is a vital subject, but it’s usually not taught very well in most books or in most schools.

Over the last half century, the teaching of color has been dominated by abstract theory. The attempt to objectify color is part of the legacy of modernism. Most color classes have you endlessly painting color swatches or analyzing paint pigments.

While there’s some usefulness to these dry exercises, they don’t help you much in the real world of painting a landscape, designing a graphic novel, or planning an animated film. It would be like teaching music by only teaching the scales, and never getting to the melody.

Color doesn’t exist in a vacuum. It’s vitally connected to the physics of light and atmosphere. And it has to be considered in relation to our quirky subjective human color perception. Color affects our mood and emotions in ways that recent science is just beginning to explain.

Let’s begin with a couple of basic questions: What does color add to a picture? What would happen if you took color away? If you drained all the color out of Cotopaxi by Frederic Church, you could still tell that you’re looking at the sun setting behind the ash cloud of a volcano.


Or if you removed the color from this picture of two fighting pirates by NC Wyeth, you could still make out the action and the setting clearly enough.


But when you bring on the color, the Church painting hits you with a tidal wave of feeling, a resounding sense of doom.

And Wyeth’s painting suddenly surges with music, romance, and adventure.

Tone may be the root and branch of an image, but color is its fruit and flower.

Color touches something deep in us. I believe that the teaching of color theory has to take all this feeling into account. As artists, we need to know how we can make the most of color, how we can make it express what we want—drama, melancholy, passion, lyricism. Good color has more impact than just about any other aspect of our work.

Whether you paint landscapes, comics, illustration, landscapes, or animation, check out the upcoming Sunday posts.

Saturday, December 22, 2007

DreamWorks Animation

DreamWorks Animation is best known for the Shrek franchise, which they followed up with Over the Hedge, Madagascar, Flushed Away, and the Bee Movie.


They were the first CGI animation company to release two features in a single year. At any given time they have as many as five films in development. Jeffrey Katzenberg, the “K” in DreamWorks SKG has said, “Walt Disney made movies for the child in every adult. We make movies for the adult in every child.”


DreamWorks Animation occupies two campuses, one in southern California, and one in the Bay Area of northern California, linked with a high tech video conferencing system. Both campuses have designers, animators and technical wizards, but the architecture and atmosphere of the campuses is quite different.


The southern campus in Glendale is Spanish style, with fountains, goldfish ponds, tile floors, and arched hallways. The northern facility, called PDI DreamWorks, occupies a modern but attractive building overlooking the baylands of Redwood City. We arrived early, and I did a quick watercolor study of the industrial architecture nearby, which I have a fondness for.

The studio works hard to create a “culture of mentorship” at both campuses, with free classes offered after hours in life drawing and character design. There’s a hallway space called the “Blue Sky Gallery” where artists can show other facets of their creative life beyond what they do from 9 to 5. Breakfast and lunch are free, and we were told that most new hires gain ten pounds in the first month or two. Free food! I gained five pounds just at lunch!

A huge visual research library (above) is available on campus. Each film takes about four years in the pipeline. “Each project has its own aesthetic,” explained John Tarnoff, head of Outreach, “and it grows out of its story and characters.”

After my presentation I was honored to meet many of the DreamWorks artists, including Shane Prigmore. He did the sketch above just for fun in a character design class where the assignment was to imagine how Ronald Searle would draw Conan.

I also met artist Nathan Fowkes (below), whose "color keys" help establish the mood and lighting of the show—in this case Shrek the Halls. Other artists bring a different range of talents to the production process: modeling, rigging, texturing, lighting, and effects. “One of the strengths of our production process,” John Tarnoff said, “is our facial animation system.”

Students who are interested in working at DreamWorks animation might want to keep a couple of things in mind. I asked John Tarnoff what skill sets are not always covered in art schools. “Any visual designer who wants to be in this business,” he said, “needs to know what writing is about: motivation, characterization, and plot. The zeitgeist of this company is that we’re all storytellers.”

Jim Conrads, my host in the northern California studio answered the same question differently. He felt that artists need to develop the social skills: teamwork, compromise, and respect for others’ points of view. “Artists are usually taught to come up with their own personal expression,” he said, “but rarely encouraged to carry out another’s vision or blend with another’s style.” Below: The Redwood City campus of PDI DreamWorks.

And the portfolio you present should go beyond the common cliches of fantasy art. Kathy Altieri, head of Show Development, told me that she gives a presentation at art schools called “Chicks and Guns,” to make the point that you need to show a lot more than sexy girls and weapons. Your portfolio will stand out if you can draw all kinds of architecture, costumes, animals, and characters.

Thanks to everyone at both campuses, and best wishes on your ongoing projects.

Some photos of facilities courtesy DreamWorks.

Friday, December 21, 2007

Prehistoric Times

Mike Fredericks, editor of the magazine Prehistoric Times announced yesterday that his readers voted Dinotopia: Journey to Chandara and Dinosaurs by Dr. Thomas Holtz and Luis Rey as their favorite prehistoric animal books of 2007. Mr. Fredericks received an equal number of votes for both books.


Congratulations to my friends Tom Holtz and Luis Rey, and thanks to the readers of PT. If you're interested in dinosaurs and ice age mammals, I recommend subscribing to Prehistoric Times. It’s the best overview out there for both the science and the popular culture of prehistoric life.

Thursday, December 20, 2007

Mr. Hitchcock's Stony Library

It almost sounds like something from a fairy tale. A man named Edward Hitchcock creates a whole library of books out of thin pages of stone bound together with metal hinges.


The mysterious writing on those stony pages consists of birdlike footprints or, as he called them, "hieroglyphs" or “footmarks.” Some of these curious stone footprints were turned up by the plow of a farmer named Pliny Moody as early as 1802. Other pages were discovered by men who split sandstone for sidewalks or gravestones.


Today scientists recognize these footprints as the fossilized tracks of dinosaurs who scampered along the muddy lakeshore 190 million years ago in what is now the Connecticut River Valley. In October I reported about a funky roadside attraction with fossils from the same geologic formation.


But the finest specimens are on public exhibition at the nearby Amherst Museum of Natural History. They were collected between 1835 and 1864 by Mr. Hitchcock, third president of Amherst College, and its first natural historian, in an era when natural history was a science in its infancy.

The Museum’s Coordinator of Education, Steven Sauter, invited me and Jeanette to his office. He showed us the articulated footbones of an emu, about the same size and shape as those of the saurian track makers.

We went further into the basement of the museum, where the skeletons of a human and a gorilla hung silently side by side. Collections Manager Kate Wellspring showed us one of Hitchcock’s most extensive stony books. She carefully turned more than half a dozen sandstone pages, resting them on soft foam padding.


The track on the right is the actual footprint. On the left is the convex impression from the mud that filled in and covered over the print. The lakebed mud was so sensitive and delicate that raindrops and insect tracks are clearly visible.


My favorite fossil was from a squatting dinosaur that Hitchcock called an Anomoepus, basically a three-toed theropod about the size of a cassowary. The impression in the ancient mud shows the dinosaur resting on its keelbone (1) and haunches (2). Beside the right foot, the chestbone (3) also made a dent in the mud, accompanied by little lines that appear to be feathers—though Steve said that some scientists debate the feather interpretation.

I could easily imagine the little dinosaur resting for a moment at the edge of the lake to preen and nap.

Edward Hitchcock developed many of his ideas before the famous British naturalist Sir Richard Owen coined the word “dinosauria,” and before Darwin published The Origin of Species. Hitchcock's vision of nature was guided both by his religious faith and his keen empirical observation.

Richard Owen tried to convince Hitchcock that the creatures making the tracks were oversize lizards, but Hitchcock believed that they were some sort of giant birds. In the retrospect of current science, Hitchcock's interpretation was closer to the mark.


Museum docent and Amherst student Crystal Edwards showed me some of the more famous dinosaur skeletons. But the tracks are more vivid than the bones.

As I left the museum, I pondered Hitchcock's own words about his “stony volumes":

"Who would believe that such a register lay buried in the strata? To open the leaves, unroll the papyrus, has been an intensely interesting, though difficult work, having all the excitement and marvelous developments of romance. And yet the volume is only partially read. Many a new page I fancy will yet be opened, and many a new key obtained to the hieroglyphic record. I am thankful that I have been allowed to see so much by prying between the folded leaves.”

Depth of Field

If you look at almost any portrait or wildlife photograph, you’ll notice that the background is out of focus. The same is true of sports or action photos.

This shallow-focus quality, known to photographers as “depth of field” is a powerful way to control the viewer’s attention. For painters, controlling focal depth adds tremendous realism to close-ups, but surprisingly few artists use it.

This may be because our eyes naturally shift focus from near to far when we look at the real world. As a result, our minds construct the misleading impression that everything around us is in equally sharp focus.


The reason cameras produce a shallow depth of field is that when you photograph a subject with a telephoto lens or with the aperture wide open, the camera can only focus on one plane of distance at a time. Everything else is blurry, and the blur increases as objects get farther from the plane of focus. Very bright highlights burn out the film or digital sensors, and may appear as sharp-focused circles of various size.

These details are taken from oil paintings for Dinotopia: Journey to Chandara to show how I used this photographic effect for fantasy paintings. If you’re painting in oil, you can use larger brushes and a wet-into-wet handling to achieve this impression.

But don’t overdo it. Effects like this are like a spice or a perfume, better if they are sensed unconsciously by the viewer, rather than jumping out as an obvious trick.

Wednesday, December 19, 2007

Car Names

What we name our cars tells you all you need to know about where our heads are at, culturally speaking.

Even back in 2000, when I did this sketch, we had car names that basically said, “I’m pissed off with traffic jams so I’m gonna blow out of here and head off by myself down some dirt road.”

But there’s a civilizing side to nature, at least to judge by the second group of names.

Tuesday, December 18, 2007

Winter Painting Tips

Now that winter is here, only the crazy people go out to paint.

I learned how to survive winter painting from one of my crazy friends, Jim Cramer. He’s far more intrepid than I am. He does all his paintings outdoors, year round. You’ll find him out there in the teeth of a gale or beside a frozen river down to about ten degrees above zero.

I wimp out below about 25 or 30 degrees Fahrenheit or about minus 4 degrees Celsius. But I love painting snow because the colors of light and shadow are much more obvious, especially around the “golden hour.”

Here are a few tips, mainly on what not to do:

--Fingerless gloves keep your hands warm without losing your grip on the brush. Put your non-painting hand in a warmer glove.

--Don’t use a metal mahlstick like I’m doing here. A wooden one is much better.

--The glare of full sun on snow makes it hard to judge color. Try painting late in the day when the shadows lengthen.

--If you’re painting in watercolor in subfreezing temperatures, don’t replace the water with white wine, because that freezes, too. Use vodka instead.

--That white umbrella on the C-Stand is meant to cut direct sunlight from behind. If the wind picks up, the C-Stand should be weighted with a sandbag.

--Your feet and your fingers are the first to freeze. Wear insulated boots, and try standing on a carpet sample instead of directly on the snow.

Monday, December 17, 2007

School Superintendent

I did these sketches of our district superintendent during a school board meeting. He's a lively speaker, with great facial expressions. He was in constant motion, so I tried to pick a few characteristic expressions, just the way an animator might look for key frames.

As I sketched, I wrote down the quotes verbatim.

Sunday, December 16, 2007

Rhythm and Hues

Creating lifelike digital animals is one of the greatest challenges for CGI artists. We’ve all seen film footage of real penguins, pigs and polar bears, so our eyes can instantly recognize anything that doesn’t ring true.

That makes the accomplishments of the team at Rhythm and Hues all the more remarkable.

Founded by John Hughes and Pauline Ts’o (below, left), they created award-winning special effects for films like Golden Compass, Night at the Museum, Narnia, Charlotte’s Web, and Babe. Rhythm and Hues is a complete digital studio, with not only post-production FX, but also CG animation (such as Happy Feet), and a range of design services.

We toured the campus, housed in a 70,000 square foot building in west LA, just north of the airport. The facility includes a sound stage, screening room, work areas for the animators, and conference rooms, all brimming over with works in progress. In the center of the building is a light-filled open stairway that serves as a mixing place for workers as they go about their day.

Huge rooms filled with humming computers do the vast amount of rendering work.

The founders, Mr. Hughes and Ms. Ts’o, are each a remarkable combination of business-person, technical-wizard, and art-lover. Their original art collection includes drawings by great Disney animators, Garth Williams, and Jules Feiffer.

They have clearly worked hard to attract and keep some of the best talent in the industry. Stacy Burstin, our host, travels to art schools and software conventions to recruit top talent. Animators are allowed to bring their dogs to work, so many of the cubicles have child gates with a canine companion at the artists’ feet.

After seeing a collection of gorgeous original production paintings and sculpted maquettes, I was a little disappointed to learn that both the painting and the sculpting have all gone digital, and physical sculptures of the characters are no longer necessary. But that seems to be true at all the movie houses we visited.

It was a real honor to meet so many of the artists and specialists after my Dinotopia presentation, and I congratulate them on their magnificent work.

Friday, December 14, 2007

Albino Frogs & Occlusion Shadows

Here’s a study from life of a giant albino bullfrog from an aquarium. The creature was the size of a plucked chicken, and about the same color. He held still for twenty minutes while I did this study.

I drew him in pencil on gray mat board, and then laid a milky wash of opaque watercolor over his whole body, saving the brightest whites for the accents and highlights. When the overall light wash was dry, I added the dark accents in pencil. These include the pupil of the eye and the places where forms push together in the folds and wrinkles.

Lighting specialists in the 3-D CG animation field call these dark places “occlusion shadows.”

Wherever two forms touch each other, or a form touches a floor, a dark line or accent results. You can see the effect by pressing your fingers together and looking at the little dark line where they touch. Not much light makes it to that point of contact. You’ll also notice it gets darker in the inside corner of a room where the walls meet.

Computer lighting programs don’t create this dark accent automatically. Until recently it had to be added by hand. But software pioneers have recently made lighting tools that can anticipate when the light will be occluded and such an accent will appear.

As a traditional oil painter, I'm fascinated by such new terminology and visual analysis developed my brother artists in the CG arena. I wonder if one of you who is familiar with 3-D CG lighting might be willing to comment on the challenges presented by occlusion shadows.

Home from Seattle

We finished up the Dinotopia tour in Seattle, returning the rental car and boarding a jet back home. From my window I could see America was completely covered from head to toe with a blanket of clouds.

A mix-up with the tickets put us into LaGuardia instead of Stewart Newburgh, so we had to rent another car and drive all night to return to Trusty Rusty.

She was buried somewhere under a foot of snow. Where did we leave her?

Now we're digging out from other piles at home. To our friends and family: I hope you'll understand if we don't send Christmas cards this year. To our mail-order customers: most orders already shipped today, and the rest will go out Saturday and Monday.

To all our hosts at bookstores, movie studios, and art schools: thank you for your hospitality and generosity, and please forgive us for not being able to linger longer. To all the readers of the Dinotopia books: I really appreciate your support; there would be no more books without it. To my wonderful publisher, Andrews McMeel, thanks for helping with all the myriad details of the tour.

And to all my fellow artists on this blog, both students and professionals: thanks for your interest in all the oddball topics of this journey and I'm grateful for your fascinating feedback. Even though I'm back in New York, the journey is not over, and I'll keep on blogging. I'll continue to do new posts and flashback reports about the West Coast.

Sony Pictures Imageworks

A cluster of seven unmarked buildings in Culver City is the home of some of the most eye-popping visual effects in the movie business. Sony Imageworks has created visual effects for films like Spiderman 3, Stuart Little, and Starship Troopers.

This is also the headquarters of Sony Pictures Animation, one of the major players in the field of CGI animation, who recently created Surf’s Up and Open Season. The animation division was set up starting in 2002 after the success of the ChubbChubbs.

As a fee-for-service post-production FX company, Sony does straight 2-D visual effects and 3-D character work, the latter including such tasks as creating a virtual Toby McGuire as a stand in for the real actor when he’s called upon to do dangerous stunts. Sony has also been a pioneer in the controversial technique of motion capture, or as they call it “performance capture” in such films as Polar Express and Beowulf, developing a new art form that bridges the boundary between live action and animation.

Sony Pictures Animation, or “SPA,” as it is known here, has its own in-house visual development department, which hammers out the story and crafts the look of the characters and environments. The rigging, animation, surfacing and lighting are then handled by the Imageworks team next door. Their artists have to cover the gamut from photo-real live action effects to the caricatured world of CGI animation. The huge demands on the computers to render all this material requires 4000 processors, and up to a petabyte of memory.

The talent pool thus ranges from artist/designers to software specialists. We toured both facilities before and after my presentation, and I had a chance to meet SPA’s visual development legends like Richard Chavez, Luc Desmarchelier, and Ron Lukas, who, along with Paul Lasaine, are busy creating environments and characters for a variety of new shows in development.

The visual effects team has developed sophisticated tools to create photo-real water, fire, and fabric, all of which has been a challenge to model convincingly in CG. For Surf’s Up, they not only had to create realistic breaking waves, but set up a control system so they could curl and crash on cue. In-house software engineers have developed proprietary tools for fur and fabric. “Cloth has come a long way, too,” said our host Steve Prawat.

Sande Scoredos, the director of training and artistic development, said that new hires spend two weeks in training, with a whole regimen of classes. They’re given a practice shot to animate, basically a digital puppet figure in a virtual room, and if they can meet the requirements, they get “crewed.”

Like all CGI animation companies, Sony works hard to keep its 900-1400 artists happy and learning. They offer free classes in life drawing and acting, bring in live falcons, take trips to art museums, and present lectures by cinematographers, classic animators like Chuck Jones—and author/illustrators like me. “We have a program in place for people who want to go up the career path,” said Mr. Prawat.

As I signed the artist wall, I felt honored to be a guest at a studio with such a respected artistic legacy. It’s an exciting career indeed for young artists to consider.

Some images provided by Sony Imageworks.

Thursday, December 13, 2007

Academy of Art University

Academy of Art University occupies a series of separate buildings scattered throughout the steep streets of San Francisco near Union Square. I visited two of those buildings: the performance hall in a converted church, below, where I gave my Dinotopia slide presentation, and the illustration and animation building around the corner.

It’s a big school. In the illustration major alone, there are 900 students enrolled in the graduate and undergraduate levels out of a student body of 12,000. Every student and every teacher we met seemed to have a genuine zeal for their work and an affection for each other.

Like the other two west coast schools we visited, (Art Center and SJSU), AAU has responded to the growth of the video game and CGI animation business by building a first-rate course of study for animation, storyboarding, and visual development—or to use the current lingo: “vis dev.”

This cutting-edge curriculum is founded on traditional knowledge and skill at drawing and sculpting the figure, with an emphasis on story and character.

“The ability to think with a pencil is the core of surviving in a 3D world,” illustration director Chuck Pyle told me. “We’re not here to train them for today or tomorrow. We want to give our students the skill set they can use forty years out.”

We visited a class that was drawing from the costumed model in a high-ceilinged top-floor ballroom. Students clustered around a pair of models dressed in the theme of a doctor and his patient. They drew what they observed within the 20-minute poses, but also used their imaginations to elaborate the characterizations.

Other themes have included Knights, Witches, and Barbarians. Clothing and costume are a key part of the training, taught by Lisa Berrett and Barbara Bradley, the latter a veteran of the famous Cooper Studios.

There’s a class in maquette building, with gray clay models (above) of imaginative cartoon characters. We also looked in on a class of traditional drawn animation.

For those of you who are chemically sensitive to oil solvents, you might be interested that AAU has state of the art ventilation and waste disposal technology.

Students can take a sculpture course where they build the figure from the bones outward. Legendary ILM creature designer Terryl Whitlatch teaches animal drawing. Once she brought in live ocelots. European-trained figure drawing master James X. Barbour teaches a whole course in drawing the head and hands.

The school is particularly strong in teaching the history of illustration. Instructors can borrow original art from the teaching collection, which includes works by illustrators from the last five decades. Unlike many art schools, where the ability to teach illustration history is controlled and hampered by snobby art history department admistrators, AAU lets Steve Kloepfer, one of America’s foremost experts, teach a whole course on the subject.

As I signed books after my talk, I had a strong feeling that I will be hearing again from each of the students five years from now, from the point of view of their successful positions inside the industry or out there as published illustrators.

To all my new—and old— friends at AAU, congratulations and best wishes!

Wednesday, December 12, 2007

Color Storyboard

On an earlier post I described my method for doing storyboards in pencil. But for the second Dinotopia book, The World Beneath, I did all the storyboards in marker. I sketched each storyboard panel on bond paper about an inch and a half by three inches.

I used a hand-held waxer to apply a thin layer of beeswax on the back side of the panels. Waxers have become antique tools; they were used for pasting up elements in old-fashioned layouts. In this way I could reposition the storyboard panels over and over again as the sequences evolved and changed.

The basic story points are typed on pieces of paper below each storyboard panel.

Tuesday, December 11, 2007

Writing, Part 2: Thoughts on the Story

In a recent post I shared some thoughts about balancing words and pictures in a Dinotopia book. In this followup about the writing process, I’d like to say something about the approach to storytelling.

At one time I thought of a long-form picturebook as a kind of “movie for your hands.” I strove for a tight, three-act dramatic structure to the plot. I read all the books on the theory of writing screenplays for movies. (Below is an unused concept sketch for a 1995 film treatment.)

But I’ve gotten away from that way of thinking a bit, because I’m realizing more and more that a picturebook is not like a movie. It’s not ruled by time in the same way as a dramatic presentation. It’s more of a “springboard for daydreaming.” Pictures invite you to hit the pause button on the forward motion of the narrative. You can consider side trips and tangents.

With this in mind, I’ve tried to allow parts of the book, like the whole sequence in Sauropolis, to function a series of episodic diversions and thought experiments before we are grounded again in linear narrative movement.

You could create a full-length picturebook without any overarching story at all, and many masters have. Most of Rien Poortvliet’s books present a loosely connected improvisatory cascade of images. Faeries by Alan Lee and Brian Froud covered the subject topically without an overarching story. So did Arthur Spiderwick's Field Guide by Black and DiTerlizzi. Shaun Tan’s recent masterpiece, The Arrival, has a strong story, but no words at all.

I feel very passionate about extended-length visual books. I’m not even sure what to call the form. It’s not the same as a 32-page children’s picture book (at 160 pages, Dinotopia is five times as long), and it’s not like a graphic novel. Some people have called it a “visual novel” or a “long-form picture book.” But whatever you call it, the words and pictures are inextricably woven, and reinforce each other in all sorts of unexpected ways.

Monday, December 10, 2007

Texture, Part 3: The Rembrandt Effect

This is the last of a three-part series on paint texture.

Rembrandt was a master at using impasto texture in the light areas of the picture, such as a necklace, a nose, or a collar. He used two devices to accentuate an area of impasto: “glazing in the pits” and “top-dragging.”

Glazing in the pits means dropping pigment into the hollows, nooks, and crannies of your impastos. You can see it here in the foreground of the painting “Market Square.” To do this, build up your impastos either with acrylic modeling paste (always before using the oil at all--never use acrylic over oil) or with oil paint mixed with a little cobalt drier to help it set up.

When it is completely dry, you can quickly glaze a thin layer of raw or burnt umber thinned down with turpentine. Most of it will sink naturally into the pits.

When that layer is dry, you can lift off the hint of the umber layer from the tops by using a smooth cotton rag with just a hint of turpentine. This will take away the glaze from the tops but leave it in the pits. But don’t try either of those last steps unless the surface is bone dry.

Glazing in the pits helped accentuate the texture on the rock on the right, above, a detail of "Desert Crossing" from Dinotopia: Journey to Chandara. These impastos were pretextured with modeling paste, and photographed a special way to bring out the 3-D quality.

The rock on the left is an example of top-dragging. To do this, I first painted the stone a bit lower in value over a pretextured base. When that was dry, I loaded a bristle brush with thick, light paint and dragged it over the base, allowing the the paint to come off on the top of the little mountains of impastos. In a couple of quick strokes, you can achieve a random quality of rock texture without a lot of fussy rendering.

Sunday, December 9, 2007

Search for Bigfoot

Hey! Shrek and Donkey are living in the redwood country of northern California.

But where is Bigfoot? It's a mystery. There are lots of rumors, but they're confusing.

If I see Bigfoot I will do a drawing of him. Is that Mrs. Bigfoot? With a female like that, the species would never continue.

Maybe I should ask this guy.

I'm in despair at this point. Perhaps Bigfoot does not exist.

Hooray! Jeanette found him.

San Jose State University

At San Jose State University, every student majoring in illustration learns how to animate. The four-year program at this public university just south of the San Francisco Bay includes the traditional practice of creating flat illustrations for print, but it also covers acting, lighting, and creature design skills needed for the burgeoning fields of CGI and interactive.

Illustration/Animation chairman Alice Carter, herself a well-known illustrator and author, helped design the new curriculum. “Twelve years ago,” she told me, “we saw the business change. Print was gone, and it was being replaced by video games and CGI animation. We stripped down the program to just drawing.” SJSU began teaching how to sculpt maquettes, how to draw backgrounds, and how to develop a narrative with a storyboard.

We met John Clapp, (book cover above), one of the professionals from illustration faculty.

Alice "Bunny" Carter walked us through the art building and showed us the impressive senior portfolio booklets, each of which looks like an “Art of” production design handbook. “We teach the exact same thing in every class,” she said, “gesture, construction, anatomy, and technique—in that order of importance. Our emphasis is drawing. We teach figure drawing in every class.” Students have a sketchbook assignment to draw fifty trees and fifty windows. They go to the zoo to draw animals from life.

Students also learn computer graphics skills once they’ve got a handle on drawing, but “we don’t give application courses, except for Maya.” Ms. Carter admitted that graduating students don’t have as much time to spend with painting and color as they’d like, but they’ve only got four years.

There’s no portfolio entrance requirement; everyone is admitted, but midway through their period of study, students have to pass a review. Once they do, the older students give them a t-shirt and welcome them into the “Shrunken Head Club.”

The big players in the industry, like DreamWorks, EA, and Pixar, have taken notice. We looked into a classroom where students were sharing animation pencil tests via a video link with professionals at Disney. Recruiters regularly pick off the graduates. Almost 100% of them are hired.

Jeffrey Katzenberg of DreamWorks recently announced a six-figure donation to help build the animation program even more. The grant is welcome in a public institution that is a bit strained for resources. Tuition is one of the lowest of the schools we’ve visited. As a result of the tight funds, the computer rooms and cafeteria are crowded.

I shared my Dinotopia presentation with a group of over 200 students packed into a double classroom. At supper later, Alice said she often hears illustrators back east complaining about the declining field of magazine illustration. But she sees the industry with fresh eyes. “We’re committed to visual development, and now we’re known for it. This is the new golden age of illustration.”

Saturday, December 8, 2007

Mentors

Every artist remembers the person in their life who first encouraged them to draw. My mentor was my big brother Dan. We shared a room when I was in second grade and we worked on the same drawings, usually sailboats.

Here’s a photo of Dan from earlier today at his home in Sebastopol, California. Here's his blog about teaching kindergarten.

One day Dan gave me a piece of advice that hit me like a thunderbolt: “Draw what you see, not what you think you see.” I had been drawing the symbols for the eyes and nose and not really paying attention to the way they actually appeared.

This began a sort of obsession for me. I wanted to draw things as accurately as I could, trying to make my eyes and hands work like a camera. When I was 13 years old, I set up this arrangement with a rocking chair, and drew it with a Rapidograph pen from observation. It’s diligent work, but a bit tedious, lacking entirely in feeling.

Dan also introduced me to the concept of silhouettes. I did this drawing the same year, 1972, when I was thirteen. It was for a poster contest promoting health in my hometown of Palo Alto, California. The message of the poster (cropped out here) was “On the Road to Better Health.” You can see the Norman Rockwell influence.

I was sure I’d get some kind of award or recognition, because I was at the top end of the 9 through 13 age category. But I didn’t win anything. Nothing. Not even honorable mention. Dejected, I asked if I could have the picture back, but they said it was the property of the contest and would be kept at City Hall and eventually destroyed.

A sympathetic lady made inquiries for me and found out that the judges rejected my entry because they decided that an adult must have helped me. But that wasn’t true! I did the poster all by myself and I spent weeks on it.

When my dad found out that I was falsely accused, he marched me down to City Hall. We found the office where the picture was stored, and a soft-spoken man found it and returned it to me. Once we explained the whole story to him, he was very kind and encouraging. I noticed his office had a drawing table and art supplies. The man explained that he was a professional illustrator. I had never met an illustrator before, and at that moment I decided I wanted to be one.

Friday, December 7, 2007

Texture, Part 2: Pretexturing

Recently we looked at the tactile quality of canvas or rough surfaced illustration board. But machine-made background textures can get a bit monotonous on their own. You can customize the surface by “pretexturing” before going into the final painting. Even if you work fairly thinly in oil in the final stages, it will appear to have lots of “impasto,” or rough painterly surface.

In the case of this image “Thermala: Alpine Hideaway” (page 76), I pretextured the entire board after the finished drawing was sealed with workable fixative and matte acrylic medium. To do this, you can use a mixture of modeling paste and matte medium (both acrylic based, and both fairly transparent). Brush this over the entire surface. The texture doesn't have to follow the details of the drawing very closely.

A good general rule is to build more impasto texture in the foreground areas and the light areas. Shadows and faraway misty regions tend to look better with a smoother surface.

Coming soon: The Rembrandt Effect.

Thursday, December 6, 2007

Tuggle in Action


My brother Dan, aka "Mr. Kindergarten," has tested out the Dinotopian game "Tuggle" with interesting results. Check out his new blog, which offers tips, techniques, and reflections from his 40 years of experience in the classroom. I'll be visiting him in Sebastopol tomorrow.

ILM and California Highlights

It's been a flurry of visits to art schools and movie studios over the last two weeks. I'm way behind on the blog!

We started off by giving the presentation at Rhythm & Hues, DreamWorks Animation, LA Public Library, Sony Pictures Animation and Imageworks in southern California.

Then in northern California we've had the privilege of visiting PDI DreamWorks and Academy of Art University. Today we went to Industrial Light and Magic in the Presidio region of San Francisco. We arrived early with an hour to kill, so we both did watercolor sketches of the Palace of Fine Arts, a remnant of the 1915 Pan-Pacific Exposition.

Then we entered the ILM complex. We blithely passed beyond guards, gates, cameras, flashing red lights, magnetic barriers, and a gurgling fountain surmounted by a bronze Yoda. I felt a little like Luke entering the Death Star. We set up the laptop in a cavernous state-of-the-art theater, and soon artists started arriving for the talk.

It was an honor to meet so many ILM legends, like Erik Tiemens, Carlos Huante, Darin Hilton, and many more whose work I greatly admire. Thanks to our host Josh Kushins (below with our folding hand truck), and to everyone who attended. And for those of you blog readers who are art students, ILM is an amazing place to work, justly famous for its Oscar-winning legacy, its spirit of innovation, its vast talent pool of about 1200 professionals, and its spectacular location.

And I haven't even mentioned the bookstores: Storyopolis, Linden Tree, Booksmith, and Cody's, where I got to meet Austin Madison from Pixar.

The full report on all the other studios and schools will have to wait a while until we catch up. Tomorrow: San Jose State!

Wednesday, December 5, 2007

Writing, Part 1: Words and Pictures

I’ve been blogging mostly about the artwork in my Dinotopia books, but the writing is just as important to me and deserves a little explanation.

Each picture, as they say, is worth a thousand words. The pictures convey mood, atmosphere, a sense of place, and character. But the writing communicates everything else. Only the writing can deliver narrative sequence, continuity, backstory, dialog, interior thoughts, names, sounds, smells, and feelings. That’s a lot of work for a few words to do.

It’s a challenge to subordinate the written text to the pictures. It would be very tempting to give over more space to the writing, because writing is much faster to compose than artwork. A Dinotopia book could be finished up in half the time if the writing were allowed to take up the majority of the page space. But I think picture books work best when they sustain us primarily in a visual, dreamlike mode. Like graphic novels or movies, picture books suffer if they are too text-heavy. I end up writing about five times as much material as I have space for, and have to cut most of it out.

With words and pictures balanced in this way, there isn’t the novelist’s luxury to indulge in rich layers of motivation, backstory, and extended conversation. It’s a sacrifice I gladly make in exchange for the glories that only pictures can provide.

Although I have the plot worked out fairly carefully in the early storyboard and outline stages, there’s plenty of room for improvisation during the final art stage. The idea for the old musical conductor character named Cornelius Mazurka, for example, emerged while I was creating the paintings.

The running text comes last, so ideas that come up during the art stage can freely enter the story. I write the final text in the InDesign page layout program, with all the page elements in place. In this way I can be sure that the text comes to a full stop at the end of every layout. I want the reader to be able to pause and enjoy the artwork without being tripped up on the page turn. And I want the book to be as inviting to the casual browser as to the reader who takes the full train ride.

Tuesday, December 4, 2007

Paint Texture, Part 1

The artwork for Dinotopia: Journey to Chandara was shot in a special way to bring out the three-dimensional texture of the oil paintings.


The standard way to light artwork for photography is to set up two lights directly across from each other. This arrangement tends to flatten out the ridges and bumps in the paint surface. Photographer Arthur Evans placed the lights more directionally.


His approach more effectively simulates the way the art would look if it were displayed on a wall beneath a skylight. Above is a detail of the painting “Chasing Shadows,” showing a background texture of stretched linen canvas.

“Most people think of paintings as two-dimensional,” Mr. Evans told me, “but I like to see them as three dimensional.”

Coming Soon: Part 2: Pretexturing Impastos

Monday, December 3, 2007

Ted Youngkin in Perspective

On the way up Highway 101 yesterday, we decided on a whim to try and visit Ted Youngkin, our favorite art teacher, who taught us everything we know about perspective (and a lot more that we’ve forgotten). I think of him every time I do a drawing.

Jeanette and I met in Mr. Youngkin's class 27 years ago. He was tough and scary back then, only because he demanded so much from us, and wouldn't stand for anything less than our best. He has been retired from teaching for a long time now. We have exchanged many letters and photos over the years, and I know that beneath that scariness is a real love for his students, based on a desire to see them do well.

It wasn’t easy to find him. I have never had his phone number, and he’s not listed. He has no email or website. No one at Art Center seemed to be in touch with him anymore. I had his address on a scrap of paper, and a guy in a gas station in Solvang found the street on a tattered map. When we got there, it was a gated community.

I rang the house from the gate, and amazingly he answered. At first he thought someone was pranking him. A minute later he met us in his driveway and I handed him a copy of the new book.

He and Martha graciously invited us in. Incredibly, he is still working every day, creating complex drawings of architectural facades in Pilot pen and marker, based on his travels all around the world. He has recent sketchbooks full of drawings, not just of architecture, but also of people.


He asked to see Jeanette’s sketches, and looked through her sketchbook page by page. An hour went by in a moment, but we had to go.

As we drove on north on the coast highway, Jeanette said something that really struck me, and I think she’s exactly right: “Perspective is the basis for all drawings, even figure drawings.”

Sunday, December 2, 2007

Art Center

I must admit that I was apprehensive about my visit to Art Center College of Design in Pasadena, California. It has been over 25 years since I was a student there (I was only able to stay for two semesters), and I wondered how it had changed.

In the early 1980s the Art Center illustration program was focused primarily on modern-art inspired “concept” illustration. Students were groomed for painting trendy magazine illustrations and album covers. The emphasis was on style. There was no encouragement for careers in paperback covers, children’s books, wildlife art, comic art, animation, movie production design or landscape painting. A few teachers demonstrated the skills of traditional realism, but they were in the minority, and some of the best of them ended up leaving to teach elsewhere.

Art Center is a different school now, and the changes are all for the better. The school is housed in a long black building set in the hills above Pasadena. But gone is the minimal, sterile look of the 1980s. Glass cases filled with student work now cover walls that once were blank. One display held a group of beautifully-observed paintings made in Gary Meyer’s class based on a live model wearing an interesting clown outfit.

Bob Kato is one of the new generation of teachers. He was taught by Dennis Nolan (the Hartford teacher). Himself a master draftsman and painter, Mr. Kato leads his students to a high level of proficiency. During the fourteen week term of his Sketching for Illustration class, he starts with line and value, follows with a model lit from a single light source, and ends with costumed models lit from multiple colored light sources. Bob Kato also hosts extracurricular sessions called The Drawing Club.

We visited Gary Meyer’s perspective class, where he was discussing fisheye distortion. Because of its industrial design component, perspective has always been a strength of the school, and Mr. Meyer is ably following in the very large footsteps of Ted Youngkin, now retired, who taught the likes of Syd Mead.

Much of the buzz about Art Center now revolves around its new entertainment design department, headed by Scott Robertson. His students were responsible for the recent book Skillful Huntsman, an exercise in production design that holds its own in print with publications by working professionals. Combining industrial design with illustration, students in this new major learn the skills they’ll need for visual development careers at the nearby movie studios, with classes often taught by instructors from DreamWorks, Disney, and Imageworks.

The school now has a prop room, filled with costumes, mannikins, musical instruments, and everyday objects to use for staging an illustration. Students can check them out to take home, or models can pose with them in school.

Every Art Center student learns how to use woodshop tools. Here’s a display of working pull toys.

Illustration chair Ann Field typifies the exciting new spirit of the school, keeping right up with the times, but respecting timeless tradition. She told me that she respects the school’s duty to provide a strong foundation in traditional drawing and painting skills that can outfit a graduate for success in any career direction. “Some things will forever be true,” she told me. No matter how art and styles change, “you will always need to know how to paint and draw.”

Saturday, December 1, 2007

Shadows vs. Reflections

“You can’t cast a shadow over deep water,” says an old law of landscape painting. It’s usually true, but only when the water is clear. If the water is murky you can see cast shadows, but their edges are more diffuse than shadows cast over on land because the light transmits throughout the medium of the diffused particles.

What happens when a cast shadow on water crosses a reflection? That’s what I was trying to capture in this 8x10 oil sketch, painted on location of the bridge leading into Toledo, Spain. It was a mind-bending challenge of color mixing.

The simple answer is that the reflection “wins,” as you can see in the closeup. The light colors reflected from the stone piers (1) don’t get any darker where they cross into the shadow. But to the left, I observed the weaker reflections of the sky and the trees (2) became influenced by the deeper colors of the water in the cast shadow.

I used the light, color, and basic composition of this plein-air study as my source for the painting “Ruined Bridge,” in Journey to Chandara. The main change was to add a half-collapsed tower covered with vines and a makeshift house.
--------
By the way, let me express my regards and thanks to all at Rhythm & Hues, Art Center, LA Public Library, DreamWorks, Imageworks, and Sony Pictures Animation. I'm very grateful for your welcome. Meeting all of you fellow artists—and seeing your incredible work has been so inspiring to me that I have been walking on air. And to my readers, please be patient for the blog posts about those visits, because with all the travel it may take quite a while to catch up.

Museum of Jurassic Technology

The Museum of Jurassic Technology in Culver City, California, is a curio cabinet of obscure relics and extinct beliefs. "Jurassic" is metaphorical; no dinosaurs here.

We wandered in late on a drizzly day. No one else was there. A bearded attendant finally appeared from nowhere. He apologized for the smell of a dog-doo and incense (a dog had just had an accident). He directed us to watch an introductory slide show in a shrine-like alcove.

A voice began in sonorous tones describing how the word “museum” should be a place dedicated to the muses. We explored the dark, narrow rooms and hallways, passing through doorways framed with heavy Victorian curtains. The displays included.
  • Micromosaics made from the scales of butterly wings.
  • Stereo floral radiographs of Albert Richard.
  • Vectography (an obscure 1940s technique for overlapping 3-D images)
  • Microminiature figures carved by Hagop Sandaldjian, figures so small they easily fit inside the eye of a needle.
  • A bell wheel, known as an arca musarithmica,
  • And displays of forgotten folk cures, like two dead mice on a piece of toast given to a child to cure stuttering.
The strange exposition that the museum offered had its desired effect, and roused the muses.

“Teaching,” quoting 18th Century museum pioneer Charles Willson Peale, “is a sublime ministry inseparable from human happiness. The learner must be led always from familiar objects toward the unfamiliar - guided along, as it were, a chain of flowers into the mysteries of life.”
Fodor's Review of the Museum