"This is the book that started it all" —Patrick O'Brien, MICA
James Gurney
This weblog by Dinotopia creator James Gurney is for illustrators, plein-air painters, sketchers, comic artists, animators, art students, and writers. You'll find practical studio tips, insights into the making of the Dinotopia books, and first-hand reports from art schools and museums.
You can write me at: James Gurney PO Box 693 Rhinebeck, NY 12572
or by email: gurneyjourney (at) gmail.com Sorry, I can't give personal art advice or portfolio reviews. If you can, it's best to ask art questions in the blog comments.
Permissions
All images and text are copyright 2020 James Gurney and/or their respective owners. Dinotopia is a registered trademark of James Gurney. For use of text or images in traditional print media or for any commercial licensing rights, please email me for permission.
However, you can quote images or text without asking permission on your educational or non-commercial blog, website, or Facebook page as long as you give me credit and provide a link back. Students and teachers can also quote images or text for their non-commercial school activity. It's also OK to do an artistic copy of my paintings as a study exercise without asking permission.
For the mountain forms I draped a piece of plaster-impregnated burlap over some chunks of styrofoam, then made the buildings out of scraps of mat board hot-glued together.
On top of all that I attached bits of white foam for the snow. Bringing that outside into the sunlight was a huge help for imagining the pattern of light and cast shadows.
Robert Post asks: "James, I need to build a maquette that is flexible to pose as a model for paintings. What material do you recommend? "
Robert, it depends how much flexibility you want. If you just need your maquette to flex a little, there's a kind of flexible Sculpey that bends a bit after curing.
If you really need a model that you can pose, you can use the build-up technique, using soft foam and latex, as shown in the video above.
The easiest way to make a skeleton is to use an aluminum armature, and you can bulk out the forms with foam, as with the simple robot maquette above.
Or if you want an exact shape with a smooth outer surface, you can sculpt, mold, and cast latex or silicon, but those processes are a lot more involved. Stop Mo Nick has some pretty good videos on this.
Bill Wiist asks: I am planning to build posable human maquettes. Have you done a blog on articulation, best materials to use, etc.
Bill, I haven't done a blog post about articulated joints yet. The simplest solution is to build your person or creature over an existing action figure by grinding away material and then adding what you want to add with Magic Sculpt.
Part 3: Maquettes and Manikins
"Meissonier was so scrupulous in his drawing that he sometimes modeled his horses and sometimes his figures in wax from which to make his drawings.
"In a subject in which there are numerous figures, animals, or objects of similar size, the element of correct perspective is of great importance, and the grouping together of maquettes, or small models in wax or clay, makes it possible to avoid those errors which creep into the work of some of the greatest artists.
Lord Frederic Leighton in his studio
"Sir Frederic Leighton frequently made use of the plan, and it is said that Detaille, in composing his battle scenes, arranges whole companies of pewter soldiers on a table on which the inequalities of the surface of the ground have been represented in various ways.
"Maquettes and manikins are of great service in composing decorative subjects when it is desired to show figures in unusual positions requiring violent foreshortening, as in flying, or in a perspective system such as is sometimes used in ceiling decoration, with a vanishing point in the air.
Aimé Morot with the skin of a lion
Animals in Motion
"When animals are introduced into a picture many studies of them are necessary because of the great difficulty in securing a suitable pose or action, owing to their almost constant movement.
"In making studies of animal motion, many painters resort to the use of instantaneous photographs with the result that they frequently show movement too rapid to be observed by the human eye. In their efforts to avoid such solecism, artists have resorted to various devices to study the motions of the animals they paint.
Aimé Morot
"Aimé Morot, who has painted some of the most spirited cavalry charges ever reproduced on canvas, was attached to the General Staff of the French army, and had all the horses and men he desired at his disposition. His favorite mode of study was to have horses ridden past him, and at a certain point he would give one quick glance at his models, close his eyes, and open them only when he had diverted his gaze to the white surface of the paper held in his lap on which he quickly jotted down the impression received. (See previous post: Morot's motion device)
Horse study by Jean-Louis Ernest Meissonier
"Meissonier had a track built, along which he had himself propelled as horses were ridden along a parallel course. Another excellent way for an artist to gain an appreciation of a horse's movement is to see and feel it at the same time by riding the animal along a wall in sunlight and observing its shadow."
Editor's note: The author is muralist and critic Edgar Spier Cameron (1862-1944) from Chicago. He studied at the Art Students League in New York and the Académie des Beaux-Arts in Paris. His teachers were Dewing, Inness, Cabanel, Lefebvre, Boulanger, Laurens, and Benjamin-Constant.
The original design for Mount Rushmore showed far more of the figures, as suggested by this preliminary maquette.
I have digitally superimposed the actual carvings of the faces over the maquette. Susan B. Anthony was supposed to be included, too.
But by 1941, federal funding was cut back, and the sculptor, Danish-American Gutzon Borglum, died of a heart attack while the work was still being carved.
This video has aerial shots that show more of the setting.
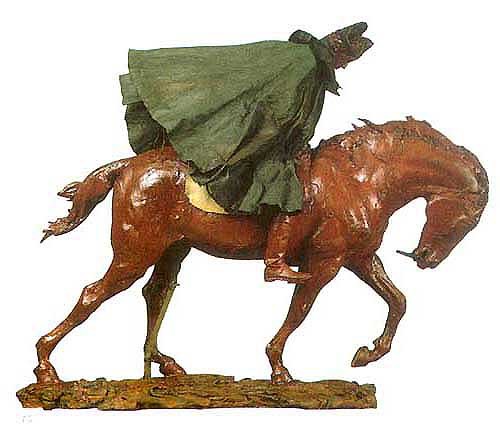
"He made a beautifully finished little wax model of a horse and a rider."
"Every detail was carefully reproduced from the real materials—the rider's cloak, hat, and spurred boots were miniature masterpieces—and in order to get the exact folds of the cloak it was dipped into thin glue and then placed in the wind so that it stiffened as it blew."
"He did these for studying compositions and light and shade. He used to place figures on a shadow box and paint the basic shadow and light shapes from them sometimes, instead of going to landscape and doing the same."
When these mixed-media maquettes came to light after Meissonier's death, they were so popular that collectors demanded bronze castings be made, so that they could be appreciated as sculptures on their own merit.
Step 1: Research. I study the scientist's papers, look at photos of the fossils, and compare animals in our world that might serve as analogues.
Anchiornis sketches
Step 2: Thumbnails. I sketch these preliminarieswith watercolor, gouache, colored pencil and fountain pen. I do these from imagination, pretending I'm watching the animals go through a series of actions. What is the moment to capture?
On some level I'm also aware of 2D design issues, but I'm really trying to project myself into the moment. I try to think of my sketch as a window rather than a piece of paper.
Sometimes the first sketch is the best. Sometimes a discovery happens later. You will never know until you try a lot of variations. I don't get too attached to any of them.
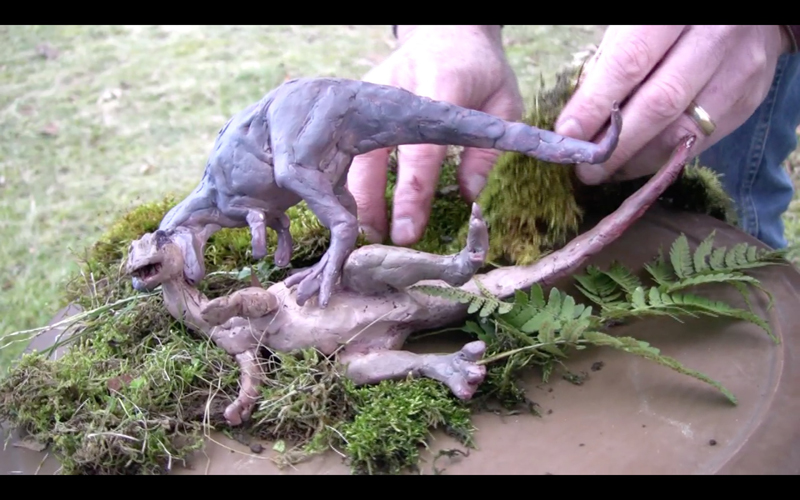
Step 3. Once the art director and I agree on the best sketch, I try to recreate in physical form the conditions of the sketch, to see if it works out spatially and dimensionally.
This stage is where all the unexpected surprises arrive to add conviction to the idea—for example the dappled light on the tree and the cast shadow on the visible foot.
Step 4. Then it's on to the finish in oil. Check out the video below if you haven't seen it already.
Step 5. Make a Documentary Video. It's the age of social media, so there's more work to do. Creating a video is the final part of the job. Of course it's not officially commissioned. There's no budget for making a behind-the-scenes video. An outside crew could never get the personal angle that the artist himself or herself can get.
Although a scene like this would have taken place 160 million years ago, I want the image to look like it was captured yesterday by a wildlife photographer's camera.
It appears in Ranger Rick, a magazine dominated by wildlife photography. So I blur the background to suggest depth of field. I spotlight the action with an area of soft dappled light cast from the tree behind us.
The following 1-minute video gives a glimpse of the process.
I make the paper-over-wire maquette by photocopying a flat plan drawing of the animal two times onto card stock. Then I make a glue sandwich with aluminum armature wire in the place of the bones. Then I bulk up the maquette with epoxy putty.
Here's an 8 minute video on YouTube of all three dinosaur paintings for the March issue of Ranger Rick Magazine.
Bill Lankford, 78, of Johnson City, Tennessee, built this amazing miniature of Dinotopia.
He worked on the 12-foot-long creation for over a year. It includes stairways, bridges, canals inspired by scenes from Waterfall City, Pooktook, and Sauropolis.
His wife Linda helped him by sculpting over 100 humans and dinosaurs using epoxy sculpting compound
.
The miniature world has been packed up and shipped to Taipei to be exhibited in the Miniatures Museum of Taiwan.
One of the first things you can do after sculpting a maquette is to rotate the maquette to see how the silhouette and the foreshortening actually look. Here's an excerpt of my tutorial video "How I Paint Dinosaurs." (Link to watch video on Facebook).
It's easy to explore variations in lighting, too. By moving the light from one side to the other, I can completely change the value organization and the way the elements read. I can also discover cast shadows that I never would have imagined.
I start by trying to match my sketch, and then I look for ways to improve on it, as in the case of this illustration of a Teratophoneus attacking a fallen Gryposaurus for Scientific American Magazine.
I do the first two sketches out of my imagination, then do the third one after looking at the maquettes. The shadow side dark predator frames the light head of the prey.
I can also fine tune the lighting on a given element.
It's important to be open to any possibility that makes for a better picture. And in the case of a physical maquette, those possibilities often arrive completely unexpectedly.
To get the full, detailed presentation on video, check out my Gumroad tutorial: How I Paint Dinosaurs.
Bluworm, also known as the Lone Animator, shows a method for building wing bones and membranes, using wire, latex, cotton, and plaster.
His build process would work well for a dragon or pterosaur. He's constructing a stop motion puppet, but his method would work equally well for a posable maquette that you could use for an illustration reference.
(Link to watch video on YouTube).
---
Previously: Skybax maquette
Yesterday I visited the advanced-placement art students in Millburn, New Jersey. Under the guidance of teacher and artist Kathleen Harte-Gilsenan, they built maquettes of a variety of creatures.
When I got there, they lit and shot them and used them to inspire sketches in black and white gouache.
I did a demo in gouache, painting from a dinosaur maquette. I showed them lots of originals, and took them through some case histories of paleoart jobs, all the way from first thumbnail sketches to maquettes and comps to finished oil paintings.
We were lucky to have a surprise guest: Michael Mrak, gouache painter and Design Director for Scientific American. He brought in some originals from his collection, and he talked about visual communication from the perspective of magazine publishing.
You can watch a brief video clip of these scenes on my Instagram page, Twitter feed, or Facebook page. While you're there, please subscribe to follow my feed.
In this 1967 video from British Pathé, prehistoric model maker Arthur Hayward of London's Natural History Museum shows he constructs miniature dinosaurs for stop motion films.
When all you need is a quick reference sculpt, you can use modeling clay. This oil-based clay never hardens and can be infinitely recycled.
This behind-the-scenes video snippet shows how I used modeling clay to visualize the lighting for a painting of a snake attacking the nest of baby sauropods. (Link to YouTube)
These maquettes take only minutes to make, but they provide a wealth of information. You can turn them to any angle or put them into any real lighting environment. Note for example how the warm light bounces around in the little shadows on the lit side.
I recommend using clay with a light gray or cream tone, which photographs well while allowing you to see the qualities of light and shadow.
After you're finished with a project, you can smoosh it together and use it again on the next job. It's cheaper than oven-hardening polymer clays like Sculpey. Modeling clay is non-toxic and safe for kids.
It is is available from several manufacturers, using closely related trade names:
Today is the release of my new video, "Fantasy in the Wild."
In this excerpt I show a fast technique for making a reference maquette that's practically indestructible and it can be put into almost any pose (Link to YouTube). It's also a fun, quick build that you can do with a kid.
I hot-glued braided cord along the arms to simulate the hydraulic lines. The pins were supposed to suggest antennas.
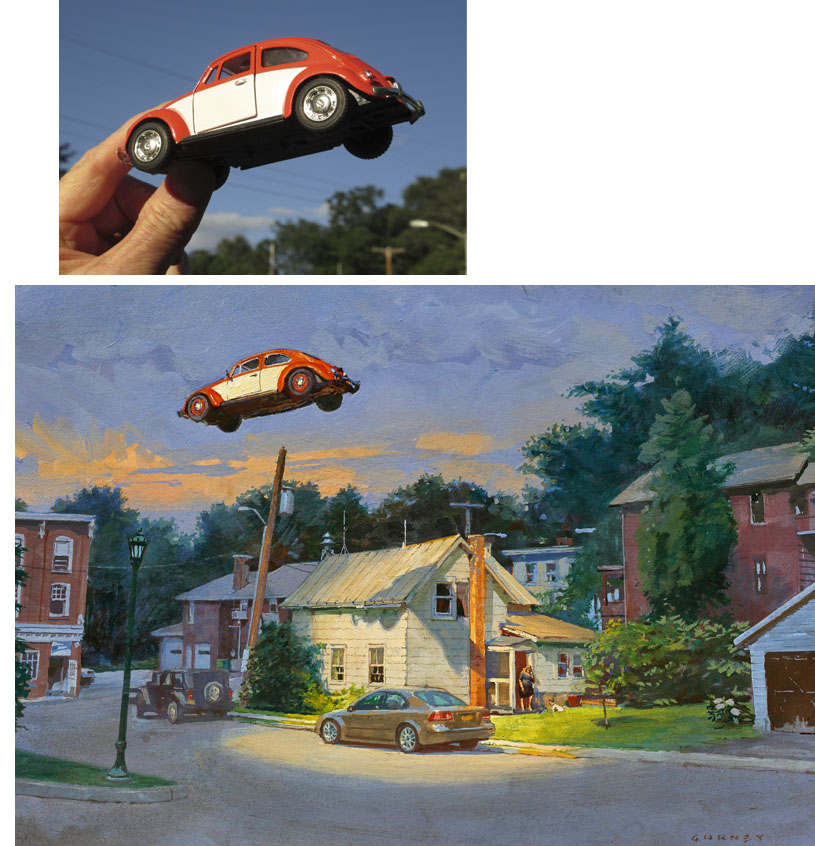
The maquette was helpful while I was out on location generating picture ideas and then doing the final painting.
I also used a maquette in the Rhinecliff location to help me imagine the flying car.
In its 71 minutes of running time, "Fantasy in the Wild" is packed full of practical tips that you can use regardless of your preferred medium or subject matter.


 , and painted in acrylic.