Monday, July 6, 2009

Utopiales Poster, Part 6: Washin

This is Part 6 in the ongoing progress report on the Utopiales poster. The first steps of an oil painting are really important, because they set up opportunities for later stages of the rendering.

When I paint an imaginary scene in oil, I usually try for three strategies in the first statement:
1.Establish the overall color temperature for each region of the picture.
2. Suggest the large tonal statement of light and dark.
3. Keep everything a little lighter than the final rendering will be.

Following strategy #3 leaves you the option to achieve your final color rendering either transparently or opaquely. If you go too dark too soon, you can only correct it with opaques. Comparing the first step with the final below of Old Conductor from Journey to Chandara, the washin should look like the intended finish with a piece of tracing paper laid over it.
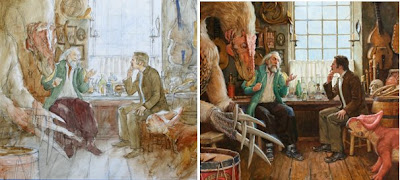
The reason for #2 is that every judgment needs to be seen in context. If you paint each area starting from white, like paint-by-numbers, it’s harder to make accurate choices. It can be done, but to me it makes more sense for observational work.

The first strategy could be called a color imprimatura. A moonlight scene might be washed all over with a light blue-green. If the scene has different colored lights, each light region should be bathed in the color of each source. If there are multi-colored light sources, a white object will take on the relative color of each source.
------
Thanks to Online University Reviews for naming Gurney Journey one of the "100 Best Scholarly Art Blogs" (#65, right next to my buddy Tony DiTerlizzi.) Kudos to my assistant professor, my budgie!
------
Earlier post on "Area-by-Area" painting, link.

Part 1: Initial Sketches
Part 2: Researching Insect Flight

Part 3: Maquette

Part 7: The Painting

Sunday, July 5, 2009

Line Drawing

We’re continuing a daily progress report on the poster for the Utopiales Festival in Nantes, France.

During the preliminary drawing stage, the studio fills with clutter.
Near the maquette of the flying machine are model horses, photos of Nantes, books about insects, coffee cups, and audio cassettes with recordings I’ve made of steam engines and street noises.

I love this photo of the square called Place Royale in Nantes. This is the period I’m trying to evoke. My dream is that a little over a hundred years ago, Nantes had strange visitors who arrived and departed by moonlight in this incredible flying machine. It flew very gently and majestically like a sailing ship, creaking and hissing steam.

Here’s the line drawing. This jpeg is a pretty large file, so if you click on it, you can see most of the details. Even though it’s just a line drawing, I’m thinking ahead to tone and color, which is coming up next.

Here’s a 40-second video showing a little about perspective and how to seal the drawing before painting.
----
More about the Utopiales Festival
Previous posts on Perspective Grid, Sealing the Surface

Part 1: Initial Sketches
Part 2: Researching Insect Flight
Part 3: Maquette
Part 7: The Painting

Saturday, July 4, 2009

Utopiales Poster, Part 3: Lighting

One of the benefits of maquettes is that you can experiment with lighting ideas that would otherwise be hard to invent.

Here are four lighting ideas. The last one is shot outdoors in overcast light with an incandescent light filling the shadows. The other three are shot indoors with two lights of contrasting color temperature.

Number two uses a technique called light painting, where I handheld a small LED light wrapped in an amber gel, sweeping it across a small area during a four second time exposure.

In night scenes, localized lighting that falls off rapidly away from the source can be an effective way to suggest scale.

All of these are shot with a self-timered Canon Digital Rebel single lens reflex camera on a tripod. The pole in the middle is supporting a Mole-Richardson Tweenie II Solarspot (about three feet above the top of the photo), which is washing the back wall with orange light.

Now I’m ready to move ahead with the line drawing.

Part 1: Initial Sketches
Part 2: Researching Insect Flight

Part 3: Maquette

Part 7: The Painting

Friday, July 3, 2009

Utopiales Poster, Part 3: Maquette

When it comes to building a maquette, there’s always a little voice inside me that says, “You can skip this step. You’ve got a good enough idea where you’re going. You can pull it off.”

Sometimes I struggle to overcome that voice, especially with a pressing deadline. But I once I start sculpting, I always have fun, and later I’m always glad I did it. In the end it saves time and yields better results.

For this “Lepidopter” maquette (thanks for the name, Sean and Moai!) I had to decide between glue gun-and-cardboard or sculpted polymer clay. The former would have given it a more flat geometric look, but I wanted to get that organic insect look.

Here’s the armature, twisted together out of thin aluminum wire. It doesn’t look like anything yet, but actually all the lengths are carefully measured against the elevation drawing I showed you at the end of yesterday’s post.


Those four loops will hold the wings and allow them to be poseable. I start blobbing on regular white Sculpey until I bulk out the body.

As I get to the outer layer and the thin parts, like the tail and the legs, I switch to Effect Fimo. When this special kind of polymer clay cures, it become slightly translucent and flexible, about as flexible as a fingernail. That way a delicate part won’t break if you drop the thing (which I do often).

The window details are built up with little slivers of Fimo, using a toothpick and an Xacto knife as sculpting tools. The maquette is only detailed on the side I’ll see; the far side is not finished at all. I cured the fuselage in the oven before painting and assembling the wings.

Then I drew the wings on tracing paper and made two sets Xerox copies, forward and reversed, on card stock. I used a waxer on both sides and laminated the layers together so that the veining pattern lined up. With the intermediate layer of beeswax between the card stock sandwich, the wing will hold any airfoil camber.

Then I epoxied the wings onto the wing struts and painted the fuselage with craft acrylics—the cheap liquid kind you get at the big box craft stores. I actually like the opacity and flow of this stuff more than artist acrylics.

Here it is. The wings look too much like an actual butterfly right now, but I’ll change them a little to look like they were fabricated by the same mind that built the rest of the aircraft.

Tomorrow I’ll talk about lighting and photographing the maquette.

Part 1: Initial Sketches
Part 2: Researching Insect Flight

Part 3: Maquette

Part 7: The Painting

Thursday, July 2, 2009

Utopiales Poster, Part 2

We picked sketch #2 (Décollage nocturne) from yesterday, mainly for the light, color, and mood. I liked the idea of a giant insect vehicle departing at night, but I wasn’t happy with the design of the aircraft. It looked like a cricket with wings. It was too much like a real bug and not enough like a fantastic flying machine. It needed to look both more believable and more magical.


I studied a great book called Insects in Flight by John Brackenbury. It’s loaded with super high-speed color photographs of all sorts of insects in flight postures. With these photos as a starting point I did many pages of sketches. These sketches are made in pencil, fountain pen, watercolor pencil, and water brush.

At this stage I try to absorb as many new ideas as possible, and just draw the scene over and over again, looking for unexpected variations. Some sketches show two sets of wings working in opposing pairs.


The breakthrough was learning about the unique flight mechanics of butterflies. Mr. Brackenbury explains in great detail how they use a “clap and peel” (also called "clap and fling") system for generating lift. The wings are brought up together vertically, and the leading edges pulled down, creating a cone-shaped funnel that draws in a vortex of low-pressure air.

I was surprised to learn that butterflies, along with dragonflies, are among the most adept fliers of the insect world. They’ll maneuver in high winds that will ground other insects. I had to revise my notion that butterflies are capricious or random aeronauts.

Anyway, the butterfly breakthrough also helped with the problem of appeal. Everybody loves butterflies. Who wouldn’t want to fly in a butterfly ornithopter?—(OK, it would be a pretty bumpy ride).

So now my job was to draw up plans for the maquette. I looked not only at butterflies, but also flying fish, old trolleys, and WWI aircraft.

The next task will be to build a 3D maquette.

Part 1: Initial Sketches
Part 2: Researching Insect Flight
Part 3: Maquette
Part 7: The Painting

Wednesday, July 1, 2009

Utopiales Poster, Part 1

I thought it might be fun to share a job-in-progress with you. So for the next few days, I invite you into my studio to see how a picture progresses from start to finish.

The Utopiales festival in Nantes, France, will take place Oct. 28 through Nov. 1, 2009. This year they invited me to contribute the artwork for the official poster.


Utopiales is one of the largest fantasy, comics, and science fiction festivals of Europe. The city of Nantes, where it is held each year, is the birthplace of Jules Verne. It’s also the home of the Royal de Luxe theater company (scroll down to the previous post).

So somehow the image has to weave together Jules Verne, giant mechanical creatures, and steampunk-flavored science fiction.

After a little Internet research I discovered that one of the famous places in Nantes is a town square called the Place Royale. I flashed on the idea of a huge insect aircraft departing from the town square. The scene could be set in the time of Jules Verne.

From these pencil thumbnails, I worked up three color sketches in oil and stuck them into the poster graphics from last year. From left to right, the titles are:
1. Arrivée Place Royale (Arrival at Royal Square)
2. Décollage nocturne (Nighttime Liftoff)
3. Départ pour Cigaleville (Departure for Cicadaville).

Tomorrow I'll let you know which one we chose and the next design steps.

Part 1: Initial Sketches
Part 2: Researching Insect Flight

Part 3: Maquette

Part 7: The Painting

Tuesday, June 30, 2009

The Deep Sea Diver

Earlier this month, the gargantuan marionettes returned to Nantes in western France, this time with a deep sea diver (Le Scaphandrier) in search of his gigantic niece.


In the second half of this video you can see how the operators lunge off the moving platform to lift the legs for each step.

The spectacle was produced by the street theater company Royal de Luxe of Nantes, who brought us the Sultan’s Elephant.
--------
Image from Flickr user misterstf
Previous GurneyJourney post on the Sultan's Elephant, link.
Report on BoingBoing, link.
More Flickr images of the Giant Diver, link.
Wikipedia on Royal de Luxe, link.
Nantes municipal website with pictures and info, link.

Mystery Artist: Water Lilies


Can you name the artist who painted these water lilies? I'll send a deluxe Dinotopia map to the first person who guesses the correct answer.
-----
Addendum: Zelas correctly identified the Russian painter Isaac Levitan (1860-1900). The painting is 95cm x 128cm and was painted in 1895, before Claude Monet's famous water lily paintings.

More samples of Levitan at Athaeneum.org/Levitan and Wikipedia/Levitan

Monday, June 29, 2009

The Elgin Marbles and the Parthenon

Here’s the debate in a nutshell: the Parthenon is perhaps the most famous icon of Athens.

Between 1801 and 1812, during the Ottoman occupation of Greece, Thomas Bruce, the 7th Earl of Elgin removed many of the Parthenon’s sculptural elements and took them to London. The so-called Elgin marbles now reside in the British Museum.

Greece would like to have the Elgin marbles back, and has just opened the New Acropolis Museum in Athens to house them. The argument for returning them is more than simply an appeal to return art to its land of origin. As a single work of art, proponents, say, the Parthenon cannot be fully understood unless the pieces are seen together.

Why keep them in London? Some argue that their safekeeping in London has protected them from looting, weathering, and other damage that might have occurred in the intervening years. But the British Museum admits that they have suffered from the act of removal, from overzealous cleaning, and from the 19th century pollution of London.

It’s safe to assume that they would receive responsible curatorial care in either location today, and either way they would end up in a museum, not adorning the Parthenon itself. But museum officials are understandably reluctant to agree to all restitution claims, which would ultimately empty the museums.

What is your feeling on the issue? Where should the Elgin marbles live? Do they represent a different case than other works of art? Please vote in the poll at left and offer your thoughts in the comments.
------
Wikipedia's gives the full story of their removal and both sides of the issue for repatriation, link.
NPR's radio coverage yesterday, link.
British Museum's official story and position, link.
New Acropolis Museum, link.
Issue blog "Elginism," with various angles on the story, link.
-------
Addendum: July 1: In the poll, 210 people voted on the question: "Should the Elgin Marbles Be Returned to Greece?" 47 (22%) voted to keep them in London; 150 (71%) wanted them to be returned to Greece; 13 (6%) voted for "no comment/other."

Sunday, June 28, 2009

Church and the Mirror

I had supper last night with the great-granddaughter of Frederic Church at her home less than a mile from Olana. She said she found one of Church’s journals from his Near East expedition as she was exploring the attic a year or two ago.

“The reason I liked him,” she said, “is he seemed to have no fear.”


During his 1868 expedition to the lost city of Petra, she told me that Church was in mortal danger from the local Bedouin tribes, who had killed an artist in the region not long before. It was considered blasphemy to make graven images. But Church “hired a bunch of people to guide him. He payed them a great deal of money so they didn’t want to kill him.”

At one point the locals blocked his way and threatened his life. Church then asked to borrow a mirror, because “he realized a mirror was a sacred thing.” He took the mirror, and, while the Bedouins weren’t looking, he painted a crack on it. He then showed the cracked mirror to the angry men.

Then, announcing he would restore the mirror to its original condition, “he went behind the tent and erased the crack.” The men believed him to have divine powers, and they alllowed him to pass safely.