Saturday, October 13, 2012

While waiting for lunch...

I never tire of the classic diner still life. There's always about a 15-20 minute time limit from when the order goes in to when the food is on the table. The time limit focuses the brain better than coffee does.


The humble catsup bottle, sugar shaker, napkin holder, and creamer are an interesting challenge to paint, because they offer a variety of transparent and reflective surfaces: stainless steel, glass, and paper. And there's the catsup creeping up the side of the bottle, backlit and warmed with transmitted light.

What interested me this time were the two colors of light on the subject. From the left was a cool light the window, which mostly looked out to the blue sky. The light inside was from a relatively warm compact fluorescent. So my first move after laying in the subject in pencil was to lay down a  ghost wash to establish the overall cool and warm statement, being careful to paint around the highlights.

I hope all this make sense. I would show you a video, but I was too preoccupied to shoot one.

Technical notes: The painting is done with a half pan watercolor set in a watercolor notebook. I used two flat watercolor brushes: 1 inch and 1/4 inch, with a few dark accents from watercolor pencils.
----

Friday, October 12, 2012

Banknote Engraver

Christopher Madden is one of the few people who creates the artwork that appears on U.S. paper money. He works at the Bureau of Printing and Engraving in Washington, DC, one of only three master artists and three apprentices. I visited him last month for a rare tour of his workshop.


It took ten years of apprenticeship for Mr. Madden to get where he is now. One of the milestone projects was to do an engraved portrait of President Obama. 


“Fortunately he was happy with the likeness,” Madden said.


Banknote engraving a painstaking art form, hardly changed in 200 years. All the work is done by hand at the printed size; there are no photographic or computer shortcuts. The lines and dots on a dollar bill are engraved with a burin on a steel plate. Each microscopic line often must be re-entered by the cutting tool several times. 


Artists learn the vocabulary of line: the “mainline,” “crossline,” and “interdot,” which add up to a tonal rendering that can suggest a curve in a cheek, a curl in a lock of hair, or a cluster of leaves in a tree. 


“It’s the most time-consuming and difficult graphic process in the world,” Madden says.

It’s often a tug of war between security and artistry. Currency has to be safe from counterfeiting, of course. Between 60% and 75% of currency that's printed ends up overseas, and a sizeable percentage of U.S. currency overseas is not genuine. 

But the money also has to look good, too. 

Most collectors agree that U.S. banknote engraving reached its highest artistry with the “Educational Series” in 1896. In those days, notable academically trained artists, such as Asher B. Durand, Walter Shirlaw and Kenyon Cox contributed their talents to make the money beautiful. 

"The admiration for artists like Mucha and Durand runs deep among my colleagues," Madden said.  

What traits make a good banknote engraver? Madden replied that they must draw well, they must work in a disciplined fashion, and they must recognize that they don’t have any ownership over their work.

To satisfy his own artistic itch, Madden is a dedicated plein-air painter in his spare time.
--------
Photo of Madden from CCAD website

Thursday, October 11, 2012

IMC Goes Live at 3:00

The enrollment for Illustration Master Class goes live today at 3:00. 


The week-long fantasy art workshop will take place June 10th-16th 2013 in Amherst, Massachusetts.

Approximately 80 participants, using both traditional and digital techniques, will choose one of five assigned illustration topics (things like "Joan of Arc," "Ice Giant," "Dragon Horde", etc.). The students proceed from sketch to finish during the week under the guidance of the group faculty. Students range from serious beginners to working pros who want to expand their skills. In addition to fantasy, science fiction, and concept art, there is also a big welcome to people who want to explore a graphic novel or a children's book solution.


This year the faculty includes:  Boris Vallejo, Julie Bell, Rebecca Guay, Donato Giancola, Greg Manchess (above), Dan DosSantos, Scott Fischer, Irene Gallo, Iain McCaig, with special guest Mike Mignola for three days of the week. I'll also join in for two days (two lectures, a demo, and a visit to (hopefully) each and every student's workspace).

Meals and lodging are included with the $2250 tuition. You stay in the posh student dorms of Amherst College. In addition to the hard work, there's always fun stuff going on: lectures, demos, book signings, caricature sketching, mock battles in armor, ice-cream runs, and frisbee games. In other words, bonding and life-altering inspiration.

It fills up fast, so if you're interested, sign up early!
Illustration Master Class
View (and vote on) previous student work at the Muddy Color blog


Sidewalk Saurian

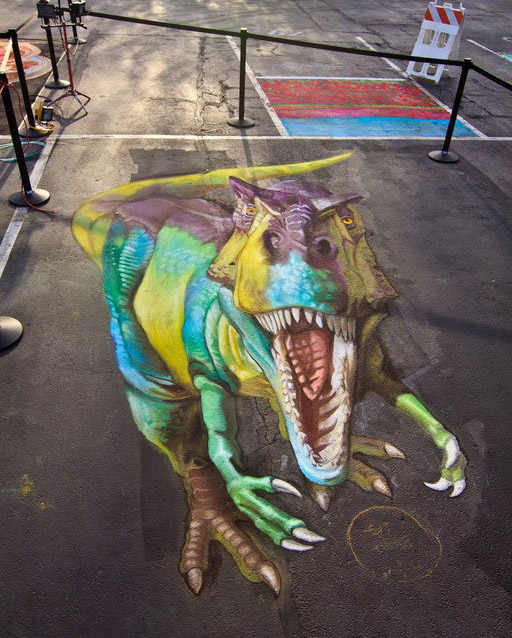
Today's Awesomeness Award goes to Rebecca Pletsch, who did this 12x16-foot chalk drawing based on a Dinotopia dinosaur for a street festival called "Chalk the Block" in Provo, Utah. 

All the proceeds from the festival went to benefit a charitable organization for children with autism.
------
If you live near Connecticut, I hope you can come to my lecture and book signing this Saturday, October 13, at the Lyman Allyn Art Museum in New London. They're hosting the exhibition Dinotopia: Art, Science, and Imagination through February 2.

Rebecca Pletsch
The dinosaur appears in Dinotopia: The World Beneath
Chalk the Block Facebook page
Article in the Daily Herald

Wednesday, October 10, 2012

Do Men and Women See Differently?

Do men and women see differently? According to a recent study reported in National Geographic, they do. 

Women are better at distinguishing colors, particularly in the blue and green range of the spectrum. Men excel at tracking fast-moving objects and discriminating details at a distance. The difference in men's vision apparently comes from how visual neurons develop in a high testosterone environment.

Previously on GJ: Men, Women, and Eyetracking

Tuesday, October 9, 2012

Mike McHale Concert


On Sunday in East Durham, New York, I attended a tribute concert for Irish whistle and flute player Mike McHale.


At the end of the concert, Mike played his whistle and told how he got started in the music. The son of a schoolmaster in Tulsk, County Roscommon, he was given a toy whistle at age six. He rode his bicycle many miles to hear the great musicians of his day playing in sessions. But he wasn't allowed to join in, even though he had learned many of the tunes. The whistle wasn't considered a worthy instrument at the time.

After listening to a session, Mike would ride home along dark streets on rainy nights, trying to keep the tunes in his head. Sometimes an elusive melody would pop into his head in the middle of the night, and he'd go downstairs into the kitchen in the dark, take out the whistle and play the tune when the rest of the house was asleep. That's when his mother knew he would be a musician. "Now I know all musicians are mad," she said.

His big breakthrough came when he was sitting in the shadows behind the older players. One day they couldn't remember how a certain tune sounded. He reached in his pocket, pulled out the whistle, and played it out from memory. That was his ticket into the royal circle. Someone gave him a flute and he was on his way at age 11. He went on to win the All-Ireland competition on the whistle, which is now an honored instrument in the Irish tradition, and Mike one of its greatest masters.

The little portrait (about 6x8 inches) was painted in gouache (opaque watercolors), with a few touches of watercolor pencils, in a watercolor journal, using large flat watercolor brushes.

Monday, October 8, 2012

Part 5 / Pteranodon Hatchling Finish

(Continuing the Pteranodon series) Here's the final painting of the young Pteranodon, incorporating Dr. Bennett's corrections. 
The pterosaur has just hatched from a soft-shelled egg, and is resting on a bed of crushed ferns. The painting is in oil, using the paint thinly and mostly transparently. The oil stayed wet enough to allow a shallow-focus treatment of the distance, something that often appears in wildlife photos. 

Since Ranger Rick is mainly a photo magazine, I deliberately used photographic effects (even though I had no photo to look at for reference) because I wanted the art to blend with the rest of the magazine.

When we passed through the Washington, DC area a few weeks ago, we stopped by the National Wildlife Federation headquarters to pick up the painting and to show the editors "Pterry" the Pteranodon maquette that I used for reference.

We shared the painting and the maquette at some of the art schools we visited on our recent southeast tour, including SCAD Atlanta, (photo by Rick Lovell). 

I'll be doing reports from the various art schools in future blog posts.
-----
-----------------
Part 4: Pteranodons / Hatchling Sketches


Sunday, October 7, 2012

Part 4: Pteranodons / Hatchling Sketches


(Continuing the Pteranodon series) I've often preached at art schools about how you should do plenty of research, and then do lots of preliminary sketches and not get too attached to any of them, because the idea is going to change.

Today's post is about me taking my own medicine.

With the first painting completed, the goal of the second illustration for the Pteranodon article was to show a hatchling Pteranodon. If some dinosaurs nested in protected colonies, wouldn't Pteranodons, too? I reasoned that they would be so vulnerable after hatching that they would need to be looked after by their parents.


I did five little sketches of Pteranodons in a nesting colony. Here are my notes to the art director:
A. Tender scene with warm colors showing female with downy chick in nest built of dried ferns and sticks. The rest of the nesting colony visible out of focus behind.
B. Looking a bit upward at the female sternbergi on a mud nest. Edge lighting from sunrise.
C. Variation of B with front lighting and the single chick protected by drooping wings.
D. Closeup of heads and faces of both mother and chick.
E. Female guards hatchling. Communal nesting colony could be visible behind. Golden lighting from behind.

Unfortunately all these sketches were based on wishful thinking and a lack of evidence, something one has to guard against in science. I did more reading about pterosaur hatchlings in David Unwin's 2006 book "The Pterosaurs From Deep Time." The book described three major discoveries of fossilized pterosaur embryos in recent years, which is remarkable, since there hadn't been any comparable finds for 200 years.

The new finds showed that the eggshells were probably soft and leathery, and they gave no support to the idea that the young were altricial (requiring nourishment), as opposed to precocial (active and mobile at birth).


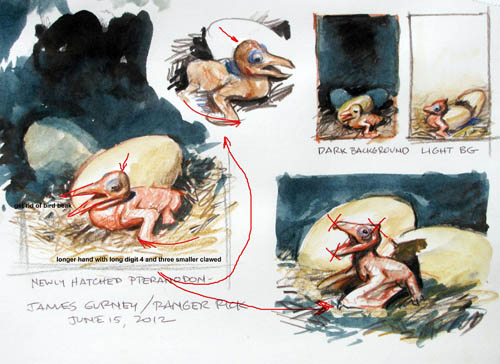
I did a new set of sketches. Here are my notes to the art director:
"The hatchling picture is vignetted so it will fit in the lower corner of the page. I gave the egg the appearance of a soft reptilian-type eggshell, and made the hatchling comparatively precocial. I followed David Unwin's summary of the recent pterosaur hatchling fossil discoveries, which suggests they probably didn't need much if any altricial parenting. Also, apparently they could fly quite soon after hatching. This affects the way I paint the little guy. I'll make sure to make him look more flight-ready than he appeared in the sketch."

Now that I had taken it as far as I could with book and internet research, it was time to show the sketches to a scientist in the field. I received the assistance of Christopher Bennett, one of the most knowledgeable experts on Pteranodons, especially their ontogeny.


Dr. Bennett replied with many helpful suggestions:
"I have marked up the babies drawing. Yes, they look very birdy, and they shouldn't other than the rounded skull and the goggle eyes. First off, there would be no trace of a cranial crest. I erased the crests on the left two babies and X-ed out the crest on the right one. The crests did not begin to develop until large and size and the beginnings of sexual maturity were attained. Jaws should not have tip hooks so, I have just drawn straighter lines. I think that the body posture of the right baby is spot on. I have added lines to indicate a bigger hand with three walking fingers in addition to the flight finger. The last problem is the biggest and birdiest of them all. The lower left baby has a pelican head-neck-trunk posture, and there is no way a pterosaur could do that. Yes, there could be a bit of an angle between the front end of the neck and the head, but the neck could not be bent back on itself at all. What I would suggest is replace the pelican neck and trunk with a lizard neck and trunk."

Tomorrow I'll show the final picture incorporating these corrections.

-----------------
Part 1: Pteranodons / Thumbnails
Part 2: Pteranodons / Maquette
Part 3: Pteranodons / Step by Step

Saturday, October 6, 2012

Part 3: Pteranodons / Step by Step

(Continuing the Pteranodons series) Now that I have finished the maquette, I'm excited to move ahead to the final oil painting. Here are four stages:

1. Pencil on heavyweight illustration board, sealed with workable fixative and acrylic matte medium.
2. Thin oil color scrubbed over sky with a big bristle brush. To thin the paint I use Liquin alkyd medium  and Gamsol mineral spirits.
3. Transparent lay-in continues. It's like a watercolor, but painted in oil.
4. Replace or redefine transparent areas with opaque mixtures.

I use a palette knife to build up the impasto texture in the foam and rocks. By mixing a drop of cobalt drier into the white, even thick passages will dry overnight.

Here's the final painting. Tomorrow I'll show you how I hatched the hatchling.
-----------------

The Pteranodon series:
Part 1: Pteranodons / Thumbnails
Part 2: Pteranodons / Maquette
Part 3: Pteranodons / Step by Step

Friday, October 5, 2012

Part 2: Pteranodons / Maquette


Ranger Rick's design director, Donna Miller, chose sketch #3 from the thumbnails I showed yesterday, and she had the inspired idea to flop the design so that the Pteranodon faced right.

Meanwhile I had been doing lots of research. I looked at photos of fossils and reconstructions of skeletons (both drawings and sculptures). I also studied lots of photos and videos of modern aquatic birds to learn how they take off, land, and hunt. 

Next I needed to build a quick maquette to see how the forms looked in 3D.

I started with a skeleton out of aluminum armature wire,  matching the size of all the parts to scale drawings. Then I bulked out the body parts with Fimo Effect polymer clay. I've found this kind of oven-hardening clay has a bit more flexibility after it cures in the oven compared to other brands.
For the wing membrane I used the Tyvek material from a FedEx envelope. Tyvek is much stronger than paper, and less prone to wrinkling. I ran a very thin wire along the back edge of the wing to hold it in position. Everything was glued with a hot melt glue gun. Then I sprayed the whole assembly outdoors with gray spray-on primer, and painted it with acrylic paint

Where I needed a little more specularity on the beak and head, I painted some gloss medium. Now I had a reference tool with posable wings that I could take outdoors into real sunlight to study the effects of light and shade.

Every photo was full of little surprises. For example, who would have thought of the cast shadow of that cranial process on the far wing?

Tomorrow I'll show how the final painting went together.
-----


The Pteranodon series:
Part 1: Pteranodons / Thumbnails
Part 2: Pteranodons / Maquette
Part 3: Pteranodons / Step by Step