SciArt in America, a free online publication dedicated to science-based art, interviewed me recently, and they published the interview yesterday.
Here's an excerpt:
Raphael Rosen of SA: I know you primarily through Dinotopia, but I read that you used to illustrate scenes from ancient civilizations. How does illustrating archaeological scenes differ from paleontological subjects, if at all? Which one do you prefer?
Yes, I worked for National Geographic as an archaeologist-illustrator, and they sent me on assignment to Jordan, Italy, and Israel. These were dream jobs for me because I was an archaeology major in college. Archaeological and paleontological illustration are very similar in the way they develop from research to thumbnails to line drawings, to finished paintings, with consultants involved at every stage.
 |
| Captured Moche prisoners, illustration for National Geographic, oil |
SA: What is your favorite medium, and why?

I can’t pick a favorite any more than I could choose a banana over an apple. Lately I’ve been concentrating on gouache, watercolor, oil, and casein. Switching between transparent and opaque media requires changing over to a very different mindset. Leaving the white of the paper in transparent watercolor takes considerable advance planning, the ability to visualize the finished effect from the start. As with all physical media, there is a sense of commitment and risk that I really enjoy, particularly when painting from life.
SA: In one of your YouTube videos, you state that you "come from a long line of mechanical engineers." Do you feel that that background has influenced your illustrations? If so, how?
Yes, because engineers use drawings to plan things they want to build. When I was developing Dinotopia, I wanted to include a lot of cutaways and machine diagrams. When I paint a flying machine or a steam powered walking machine, I imagine its entire walk cycle, and I try to figure out its working parts. A lot of the vehicles from Dinotopia are based on kit-bashed plastic models.
 SA: In that same video, you state that your father used to say that, "If you can draw it, you can create it." Can you explain what he meant, and whether that saying has affected your artworks?
Most of my paintings try to make the impossible look inevitable. I like to think beyond a single work of art and imagine things from many angles, or imagine how they would look in a thousand years. What would happen if an object were picked up by an alien culture and used in a different way? Such leaps of imagination are what an engineer is doing all the time, and most science fiction people aren’t too far removed from that kind of thinking.
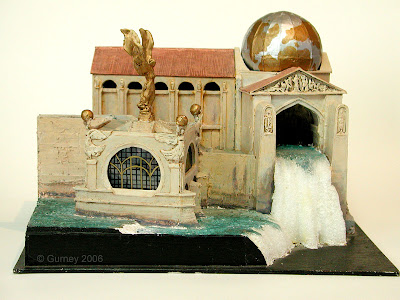 SA: I'm stunned by the detail and care you put into your maquettes. How would you explain to someone who knew noting about your work why you create them?
Inventing shapes and forms without using a maquette is not too hard, but where a maquette really makes a contribution is in allowing me to try out different lighting ideas. Good lighting is the key to believability. It’s rare for someone imagining poses to think of foreshortened forms, strange overlaps, and unexpected cast shadows.
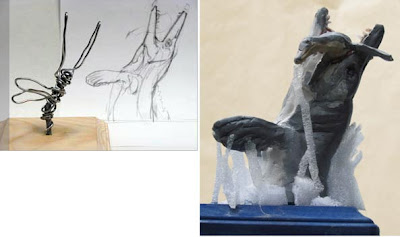 SA: How do you make your maquettes? What are the materials? How long does the process take?
For dinosaurs and other prehistoric fauna, I make a small maquette, using Sculpey, an oven-hardening clay. I shape it over an aluminum wire armature, matching to a scale pencil drawing. After the maquette is cured, I paint it in acrylic and often glue feathers or other textures onto it. For a mosasaur leaping into the air, for example, I glued some strips of flexible packing foam to simulate water foam. I photograph the maquette in outdoor light using a single lens reflex camera on a tripod. This process allows me to experiment with a variety of lighting ideas and choose between front-lighting or back-lighting.
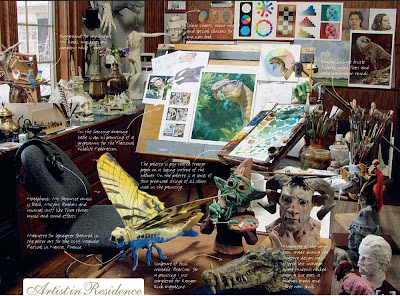 SA: I'm a great fan of fantasy illustrators, including Wayne Douglas Barlowe, who can depict alternative worlds in great detail. Can you tell me the challenges involved in this task, and how it differs from painting, say, a still life?
Wayne Barlowe was a big inspiration, and his parents, as well, who did illustrations for the Golden Guides of natural history. Any kind of imaginative realism: paleoart, concept art, wildlife art, or historical painting is totally different from a still life because you start with a hazy mental image and you have to provide the convincing details in stages.
I’m thoroughly old-school. I start with small thumbnail sketches in pencil or watercolor. If it’s an architectural subject or a dinosaur, I’ll build a maquette out of any material at hand.

If necessary I enlist models to pose in costume, usually friends or neighbors. I either take photos or draw tone paper sketches of the models. I have a large mirror mounted in the studio and often do action studies of myself posing in costume to get the basic pose. I also have a scrap file of color magazine photos that I use for texture and form ideas. If the painting requires scientific or historical accuracy, I consult with experts at every stage of the process and incorporate their suggestions.
After all these studies, I work up the line drawing—and sometimes a full charcoal drawing—and finally begin the final painting. People can follow the process in my videos “How I Paint Dinosaurs” or “Tyrannosaur: Behind the Art.”
 SA: Do you feel that illustrators who focus on science topics, including paleontology, have an impact on their respective fields? If so, how, exactly?
I don’t know. I suppose you’d have to talk to scientists in those fields. But perhaps it’s fair to repeat the old saying that paleontological illustrators and moviemakers are the eyes of paleontology. New discoveries and new theories take on a physical, concrete presence when they are visualized well. And if they’re not visualized well, old, incorrect stereotypes can be reinforced.
I come from a Renaissance mindset where science and art are very closely allied. At its most interesting hypothetical core, science is a powerfully imaginative discipline, where the ability to visualize and to draw connections between disparate elements allows for great leaps forward. A similar kind of imagination, informed by fact, and tempered by skepticism, makes for memorable art.
SA: How closely do you work with paleontologists, and have your drawings ever changed how they thought about fossils and ancient life?
I’ve worked with many different paleontologists while working on science articles for Discover, National Geographic, National Wildlife, and Scientific American.
For each project like that, we typically work with just one expert, so that we don’t run into the need to adjudicate conflicting theories. My job for such a publication is to try to give visual form to their ideas. In the case of the “World of Dinosaurs” postage stamps for the US Postal Service, I worked with five different experts, each in a different field of study, because we had to look after a variety of fauna and flora. For the Australian stamps (“Australia’s Age of Dinosaurs,”) we had a principal consultant, Tom Rich, who introduced me to several of his colleagues, and each expert helped with specific questions.
SA: Can you tell me a little about how clients find you for their dinosaur-related projects?
Some opportunities have come from visiting scientists in museums or conventions. Other times I’ve gotten jobs as a result of sending samples to art directors. In the age of the Internet, I suppose art buyers find out about my work from my blog, my website, or my videos.
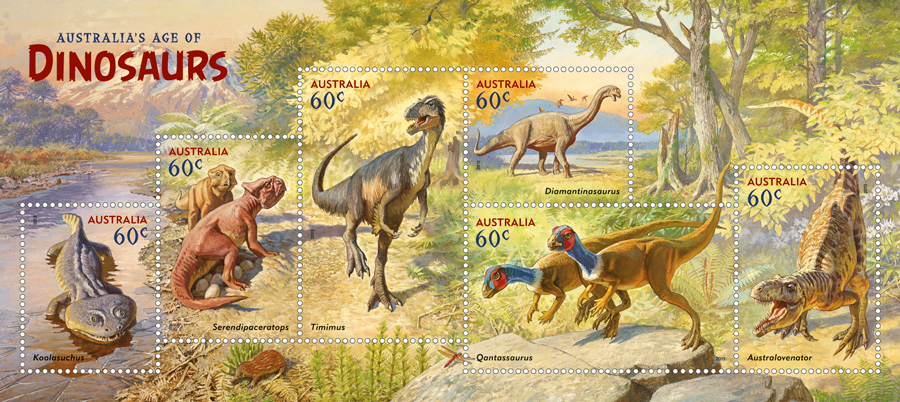 SA: Are there concerns or challenges particular to creating images for stamps?
Yes, definitely. Recently, Australia Post commissioned me to design a set of postage stamps showing six prehistoric animals in a panoramic landscape. The project took several months and required a lot of work behind the scenes. The research stage was especially important since Australian dinosaurs are known only from fragmentary fossils, most of them recently discovered. Some of the dinosaurs would have to be reconstructed from single bones, so a good deal of extrapolation would be required.
Before I went too far with sketches, I traveled to Melbourne to meet with the museum specialists. I spent more than a week studying the collection of the Museum Victoria under Tom Rich’s guidance. We looked at the bones not only of the dinosaurs, but also the large amphibian Koolasuchus and various insects and small mammals that lived alongside them.
I also visited the Royal Botanical Gardens and some forest parks near Melbourne to sketch the growth habits of plants that were analogous to those of the middle Cretaceous. During this period, southern Australia was just beginning to detach from Antarctica and it was still a polar climate.
Like the “World of Dinosaurs” stamps I did for the US Postal Service, this was a larger panorama with stamp subjects inside it. One of the challenges of this kind of layout is that each stamp has to make sense by itself when it is detached, but it also has to work in the context of the larger scene. The design also presents a challenge of relative size. Since dinosaurs came in greatly varying sizes, the larger dinosaurs had to be pushed farther back in depth in order to be able to fit into the stamp grid.
I also had to be aware of fixed requirements of the stamp design. Each stamp needed to include the word “AUSTRALIA,” plus the denomination and the name of the animal. In those areas there couldn’t be any dark shapes or busy detail.
Furthermore, the outer areas of each stamp had to be kept light in value and warm in color so that the helicon areas would read. Helicon is a security feature consisting of a phosphor material printed on the front of stamps which helps automated machines identify the presence of a stamp. I learned about the helicon requirement after doing the comprehensive sketch, so I had to do away with the dark values between Qantassaurus and Australovenator.
 SA: Do you have any advice for aspiring illustrators who might want to specialize in a field related to science?
It’s important to be able to read the scientific papers yourself, and not to have to rely on someone to interpret them for you. Sketch constantly. Be alert to living analogues as inspiration, and watch a lot of wildlife videos. Paint outdoors. It’s the only way to understand lighting and color. Think about behavior at least as much as morphology.
 SA: I also have one more, wide-ranging question: what are your thoughts about the relationship of science and art? Can one inform the other?
Painting a dinosaur is a lot like finding a fossil in the ground. You pick up broken fragments out of the dust. You fit them together and fill in the missing pieces as well as you can. Somehow, out of the decay of deep time, an image begins to form. Something long dead lives again. The bone grows flesh and skin and a living creature steps from the shadow into the light, and we can almost feel its hot breath on our necks.
Dinosaurs and other prehistoric creatures live in the boundary zone between imagination and reality. After a picture leaves my easel, it begins its journey to the printed page. It will be published alongside the scientist’s article, and will reach potentially millions of people, and shape the way they imagine a world that they will never see with their own eyes.
My step in the process is to try to try to take a snapshot of world that we know once existed, but that no one has ever seen. This is why I love painting dinosaurs. It puts me on the knife edge between knowledge and imagination.
----
Read the full interview at
SciArt in America


 Arthur Denison, which I sculpted out of Sculpey polymer clay
 . White is best if you're using it for direct observation, because you can really see the subtle plane changes and the effects of reflected light.
 because it's fast and gets into all the small cracks.
 and two-part epoxy sculpting compound
 for the sculptural details. I used acrylic paint for most of it, and metallic enamel for the dome.


