


Here's a technique to capture that lens flare effect we see all the time in photography.
 |
| Traffic Lights, gouache over casein, 5 x 8 inches |
Note the gradation of the dark values from the brightest spot behind the middle of the utility pole. It becomes gradually darker in the lower left and right corners.

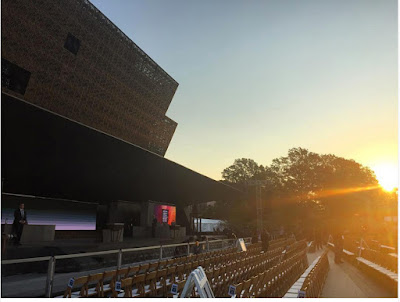
Here's the photo that inspired me (of the new museum in Washington). Note how there are really two gradations going on: the darks go from orange in the vicinity of the sun to near-blacks in the shadows on the left. There's a second gradation going on in the sky.
 |
| Underpainting for lens flare effect |
The day before I go out in the field, I paint an arbitrary gradation for the dark areas. I use casein, which dries with a "closed surface," which means it won't reactivate when rewet. It is fully dry when I head outdoors.
I don't yet know what subject I'll be painting over it, but I want to choose something with a lot of forms intersecting the sky.
The video shows how I paint the sky as an opaque layer over the underpainting. Whenever I need to add the wires and other details back into the scene, I try to match the underpainting color.
(If you're getting this blog post as an email, you may need to follow this link to watch the video on YouTube)
James Gurney on Pinterest
@jamesgurneyart on Instagram
Gouache Materials List
18 comments:
Great painting. But to add in details and wires, would you have been able to scrape back to the underpainting tone?
Masterful! I swear that I feel a strong need to squint when I look at the painting!
So it seems like you're allowing the underpainting to come through as the darks/silhouettes and you're really painting the lighter sky, cars and a few areas of accent in the center to pull the painting together? What an interesting approach to painting this kind of light effect, I never would have thought to do that :-)
Wondering if the light area on the utility pole is glazed. Thanks!
Robert, I tried scraping through to the underpainting with the brush handle. But even when it was wet, the white gouache layer was too opaque. That idea might work in oil, though.
Tom, thanks! I'm so happy to hear that. I guess we pick up cues about the brightness of a source by the surrounding glow.
Karen, yes, what you're seeing is just the pure underpainting in the lower areas of the picture. It's an unusual technique. Bernie Fuchs, the illustrator who passed in 2009 did a similar technique in oil where he rubbed through a gradated layer to the light canvas to suggest sky holes or light sources.
Denny, I did use a very light amount of yellow and white Nupastel in the center areas and a little dark red-brown Nupastel in the far left of the picture.
James— this is great stuff. I love the effect you are after and your results.
James, you said "lens flare" in your post, but isn't what you're painting the corona effect? I think it's important to distinguish between the two as you've done in the past since the physics behind the two phenomena are different.
Here's the post I'm specifically thinking of, but I know that there have been others.
http://gurneyjourney.blogspot.com/2008/03/color-corona.html
Tyler, fair enough. It really does fit closer with what I've called "Color Corona." But since that term is less well known, I mentioned lens flare. Lens flare includes both the sharp artifacts that appear in a camera lens, but also the overall haze or washed out quality near the source, and those effects occur both in cameras and in the human eye.
Do you happen to know why this happens in the eye or the camera?
D, the Wikipedia page explains it pretty well. https://en.wikipedia.org/wiki/Lens_flare
The effects in the human eye can come from light scattering in the jelly-like liquid inside the eye, from scratches on the cornea, and from diffraction artifacts of the eyelashes (just squint at a bright light and you'll see it.)
And there's nothing wrong with trying to capture purely camera effects in a painting, such as motion blur, shallow focus, bokeh, etc.
Amazing technique, it's basically negative painting, right? Can't wait to try it!
James, you may have answered this before, but what type of brushes are you using for the casein paints?
Thanks!
MJ Artist, I'm using mainly flat and round synthetics. If you Google "Gurney Gouache Materials" you'll find a post with links to a nice travel set from Richeson that has the brushes I use a lot.
Best,
James G.
I've been wondering how to do this effect. I really appreciate this post!
Wonderful! I have a question. What are the differencies between acrylic and casein? they seem to work both the same way
GhostVillage, they're quite similar, but acrylic has a much stronger emulsion strength, that is the glue-bond of the binder is much tougher. That changes the final quality of the dry paint, but also how it handles on the brush.
Thanks, this looks like fun and a good way to be ready for that fleeting light at the end of the day.
Post a Comment