


Glenn Tait

1. The Coroplast Pochade Board
This light-weight, three panel, rig is built using a 14.5" X 6.25" panel of 1/4" plywood painted black to which black Coroplast panels are attached using Chicago screws and washers. Metal rods are inserted the length of bottom panel giving structural strength to support my water and paints. They also double as magnetic attachment points for my water containers. Neodymium magnets are placed into the right side of this panel to hold my palette. The board can be tilted using the 360 degree head mount on the tripod while the panels are adjusted with a 550 Paracord rigging tightened with a Cord Lock Stopper. Brushes are stored in a hanging support under the rig for easy access.
1B. Water cups
Other materials, extra water, etc. are easily accessed from the backpack, which hangs beneath the tripod acting as an anchor holding everything down.
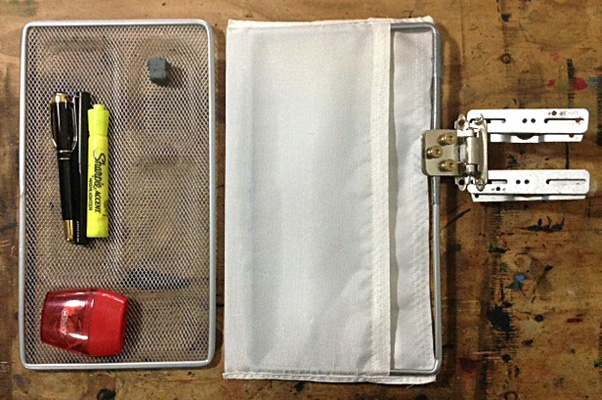
2. Diffuser Screen
A wire mesh desk caddy found at a Dollar store made a great frame for my diffuser. The mesh was removed from the frame using pliers. A white nylon stuff bag was sewn for the diffuser cover. The support was made using a set of self-closing hinges with knurled screws for tightening all of which was attached to two sets of metal strips.

2B. Diffuser Clip
This unit slides onto the plywood board and can be used whether the board is in a landscape or portrait orientation.

3. Tripod
I use a light, compact tripod with a sturdy load capacity. The Triopo
4. Construction and Materials Notes
I have no workshop or power tools but was able to build this using a few hand tools: a leather punch for the holes in the Coroplast , a universal screw starter to "drill" holes in the plywood, a utility knife to trim the plywood, scissors, a butane lighter (to melt the ends of the Paracord
 ) and pliers.
Materials included Coroplast/Tenplast, Gorilla duct tape , Chicago screw
 , various sized washers (metal and rubber), 1/4 T-nut, Neodymium magnets, 550 paracord, Cord Lock Stopper, self closing hinges, brass knurled nuts and screws Loctite Super Glue for Plastics
 , (an instant super glue used to attach the magnets to the Nalgene containers.)
Materials included Coroplast/Tenplast, Gorilla duct tape
Nate Billings

Here are a couple of pictures of my build. I need to do some upgrading, but right now things are held on with clips and velcro in a modular system. I keep velcro on the back of my watercolors, cups, etc. It prevents things from falling off.

Normally, I attach it to a tripod, but for this event, I had to use my standard easel. The bulldog clips allow me to attach it below the painting for easy access!
Keith Yong
Keith Yong

Just wanted to share my very simple plein air setup. It's essentially just a flat plywood surface and some clips. I plan to add a light diffuser on top in the future too. It weighs at 440g (15.5 oz) and has a large available surface area.

With this setup I can use it pretty much like a desk top. I attached a mini Swiss Arca plate on the bottom with screws and it's very solid. The only downside is that it doesn't fold, but it fits well inside my backpack like a thin book.

Edit: "I did add a light diffuser in the end and it works perfectly"
Piya Wannachaiwong

Edit: "I did add a light diffuser in the end and it works perfectly"
Piya Wannachaiwong

I just wanted to share my version of the Sketch easel (frankly I do more call it the Gurney easel). It's about 9" tall by 12" across for each panel. I use a Caran D'Ache 15 color gouache pan set
I've incorporated a 'ledge' for my sketchbook to sit on. It's simply a 1.25" tall and 12" wide strip of wood glued on just above the hinges.

Wood-burned onto that ledge is the instruction 'First, Composition, then Values and finally, Colors'.

Also after using the easel for the first time, I decided I wanted to install a fold out brush holder. It's 4"x7", with ledges on the bottom and side. As I'm left handed, it's installed with simple hinges on the left side. I simply set the brushes down, I have found drilling holes on the side so the brushes can stand up makes the brushes an obstacle.


Also after using the easel for the first time, I decided I wanted to install a fold out brush holder. It's 4"x7", with ledges on the bottom and side. As I'm left handed, it's installed with simple hinges on the left side. I simply set the brushes down, I have found drilling holes on the side so the brushes can stand up makes the brushes an obstacle.

Otherwise, it's pretty close to what you suggested in your video. I have yet to install a holder for a light diffuser, but further down the line I probably will.
By the way, if anyone asks, I don't recommend birch plywood from Michael's. It's layered wood that tears apart under a circular saw and definitely made this easel a little less refined than I'd like. I'm planning on building another one for my wife with oak soon.
----
 Thanks, everybody for sharing all these wonderful insights on all these builds. If you want to join the fun, check out my tutorial video. It covers how I make both the easel and four different diffuser designs.
The HD download of "How to Make a Sketch Easel" is more than an hour long and costs only $14.95.
It's available now from Gumroad, and Sellfy, and Cubebrush
The DVD version is available for $24.50, and it includes a slide show. The DVD is also available on Amazon
My materials list for making a sketch easel
Also check out previous posts Your Sketch Easel Designs and Your DIY Sketch Easels
5 comments:
Honestly, I don't have the kind of time it takes to be this sort of "gear head". I'm going to stick to my sketch book and eight color pencils.
Really enjoy seeing what people have come up with that suits their own style!
You posted my homemade gear a few weeks ago, I'm really enjoying seeing others, and getting ideas to further improve mine. Thanks for the swell posts!
Thanks Mr. Gurney for mentioning my setup! I did add a light diffuser in the end and it works perfectly:
http://i.imgur.com/7zGlyYf.jpg
Hello
My mother told me that I have 5 thombs on each hand so I use a simple music stand :o)
Post a Comment