


Let's start with the finished drawing by Xubucheng. (Edit) Blog reader ZS has generously translated the Chinese notes in the book, which I'll show in bold after each step, followed by my own observations about what he seems to be doing.

1B. Use simple straight lines to mark out the shape/contour of the head, locking in the basic positions of the eyes, nose and mouth and ears. 35 minutes."
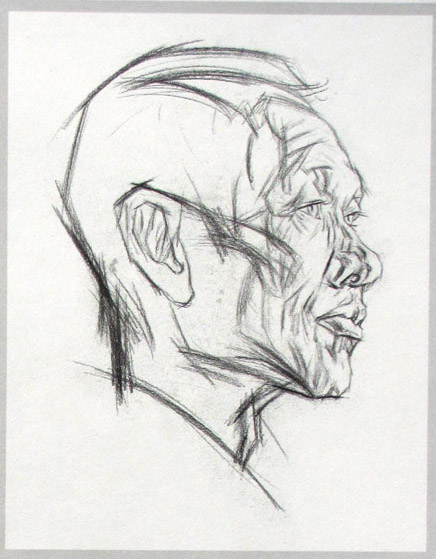
(My observation) In the the first step he doesn't copy contours, nor does he place spots. His framework is built from nearly straight line segments bounding important lines at the edges of the form.
He's also looking within the form for big plane changes (brow, cheek, chin) and for feature placement. Since this is an upshot, the lines for the brow, eyes, bottom of the nose and mouth are parallel, slanting downward in perspective. The ear and nose are roughed out in a few simple lines. These lines are drawn with controlled sweeping movements of the arm.
2. "Once the position of the features are determined, use shadow boundaries, projection lines, perspective lines and knowledge of head anatomy to further detail out the form of the features.
(35 minutes."
(35 minutes."
This kind of thinking—using arcs or gently curving line segments—is carried a lot further. Now he's more concerned with smaller plane changes. He's doing a lot of cross-checking at this stage to compare alignments. By the way, I believe each of these drawings was made separately for the purpose of the demo; I don't believe they're actually from the same sequence.

3. "Once the features have taken form, use shapes of light and shadow to delineate/differentiate the values, thereby achieving clear and accurate form and overall completion of the drawing. [ Trans. Note: I think he means overall coverage and composition of the picture, all that is left is detailing.] (45 minutes)."
In the penultimate stage, the planes are defined in terms of tone, drawn with parallel lines and a slight amount of smudging.
(Final stage--see first image in post) 4. "While in the process of drawing, always remember to compare the value relationship, structural relationship of the features, taking notes of the prominent/striking features on the face, and constant cross-checking and measurement until the portrait is complete."
(65 minutes)(total time 3 hours)
With the structure of shape, line, tone, and form established, he can resolve the smaller nuances to arrive at the drawing you saw at the opening of the post.
So there you go, Charles, and thanks for translating, ZS. If there's anyone out there trained in this method, I'd welcome your help in the comments.

Edit: To address Keith's question: "James, you said that you think these drawings were made separately for the purpose of demonstration. Can you elaborate on this?"
Keith, my impression was that the drawings didn't line up exactly. Rather than being a single drawing photographed in stages, my hunch was that it might rather be four separate drawings prepared in matched steps. They used to do it this way for art instruction books in the 1950s to save the hassle of having a professional copy camera setup in the studio. Below are two stages overlaid, so you can see for yourself.

Previous post: Chinese-Russian drawing
Russian Art Academy (interview with Professor Sergey Chubirko)
22 comments:
His method looks similar to Charles Barque method (which is taught in art schools in China).
Here is a link to the book on Amazon.com in case you haven't seen it.
http://www.amazon.com/Charles-Bargue-Jean-L%C3%83%C2%A9-G%C3%83%C2%A9r%C3%83me-Ackerman/dp/2867702038/ref=sr_1_1?ie=UTF8&qid=1340800227&sr=8-1&keywords=charles+bargue
(1).
Be sure of the position/alignment of the head, and get the block in right.
(2).
Use simple straight lines to mark out the tongue[Trans. note: I don`t know why he mentions the tongue] and jawline, lock in the basic positions of the eyes, nose and mouth and ears.
(35 minutes)
2
Once the position of the features are determined, use shadow boundaries, projection lines, perspective lines and knowledge of head anatomy to further detail out the form of the features.
(35 minutes)
3
Once the features have taken form, use shapes of light and shadow do delineate/differentiate the values, thereby achieving clear and accurate form and overall completion of the drawing.
[ Trans. Note: I think he means overall coverage and composition of the picture, all that is left is detailing.]
(45 minutes)
4
While in the process of drawing, always remember to compare the value relationship, structural relationship of the features, taking notes of the prominent/striking features on the face, and constant cross-checking and measurement until the portrait is complete.
(65 minutes)
(total time 3 hours)
Awesome :] Thank you!!!
I'm wondering if tongue might also mean/is written the same as mouth.
Glad you asked, Charles.
Thanks for translating ZS and PT.
Kyle, I believe there are a lot of similarities between Bargue's approach and this method, but some important differences, too, as the French way of drawing got filtered through the Russian and Chinese academies. I notice a bit more use of curved lines for bounding the form and crosshatch in the final drawing.
I`m sorry, I made a translation error.
(2) should be:
(2).
Use simple straight lines to mark out the shape/contour of the head, locking in the basic positions of the eyes, nose and mouth and ears.
instead.
My written Mandarin Chinese is really rusty, sorry for the error. It should be pretty correct, since it makes sense now.
P.T. Waugh,
Nope, they`re pretty seperate words. I just confused between a few words, thus making the error.
You`re welcome, glad to be of use.
Thanks for the clarification, ZS. I just updated the text to reflect your edit.
James, you said that you think these drawings were made separately for the purpose of demonstration. Can you elaborate on this?
Keith, have a look at the stuff I added for you at the end of the post.
Oh wow. Thanks James.
ZS and James,
This is wonderful! Thanks for sharing this and breaking down a barrier (I don't speak Mandarin Chinese) to sharing and learning! :-)
Do you have a video of this artist working? That would really be fun to see (and hear) even without translation.
Hope to see more!
Amazing how the art instruction lineage for a Chinese teacher would loop back to France. Kind of like the art equivalent of the Japanese car industry's study and refinement of James Demming's theories (Statistical Process Control)for quality control.
Kindly
Jonathan Gilpin
Coordinator
Lexington KY Comic Creators Group
web: http://lexkyccg.blogspot.com
email: lexkyccg@gmail.com
I don't remember where I found these links but these sites show the Chinese approach. If you dig around you can find more videos.
http://v.ku6.com/show/beMIOY41dfDUNT30.html
http://so.56.com/index?type=video&charset=utf-8&key=%E6%9C%B1%E4%BC%A0%E5%A5%87%E6%95%99
http://www.meishu211.com/a/sumiaorumen/sumiaoshigaoxiang/2058.html
I think the differences in the methods are actually much more radical than may seem by just looking at the results. The Russian drawing method added a very important feature (or rather retained one) that the french academic teachers seemed to omit, but was present in the renaissance and barocco masters. The element is constructive anatomy. They way drawing is taught at the russian academies is that the model is what you need to start and and finish a drawing, everything else is done from your head(knowledge, anatomical reference, other models, etc.), and even then, the less you rely on the model the better. The proportions and some details, are all that you need to take. This, of course, is the general idea, some may rely more on the model, some less.
This drawing, i think, doesn't make the system clear enough. In the Repin Academy, drawings are grouped in to two main categories. They are: tonal drawing, and "constructive" drawing. (usually drawings utilize elements from both, this would depend on the your own taste and the taste and style of your professors). Ideal tonal drawings have the values taken from life accentuating form with small plane breaks and light. Usually, these drawings depict the models more faithfully, incorporating the model's irregularities and asymmetrical elements.
Constructive drawings, ideally, are drawn without a light source, and aim to render the form through a conditional light that shows the form best. The drawings also utilize more schematic anatomical constructions rather than copy the model. Both styles rely heavily, if not mostly, on the boarder between the light and the shadow (I don't know how they call this in english) The big light, and the big dark, are what accentuates the big forms. There are some similarities with the Barque method ( it's realistic drawing after all) for example, modeling the lights while keeping the darks simpler etc. The most important thing however, is that one should never copy the model, feeling free to omit anything that doesn't work for the whole and disrupts the form (including everything from cast shadows to whole arms and legs).
As for the process shown here, in this drawing there are certain things which don't make much sense to me. First of all, the drawing doesn't seem to be moving logically from one stage to the next. For example, in the first stage, all of the construction lines are parallel, while in the final one the features are all "crooked". The problem with this lies deeper. To be rather honest, the way this drawing is begun, seems very improbable for a drawing done in the classical russian and chinese academies, and this stage would most probable be deemed "unprofessional". A drawing in the Repin academy is usually started from the skeletal element closest to you (after jotting down some big proportions, however not from the contours but from the boarder between the light and shadow and from the center axes of the big forms, and then sort of pushed back into the paper. This pushing in and pulling out is the main idea of any drawing. The beginning of a drawing would most probably look like the second stage, where the drawing is made in a much more alive and sketchy manner while still trying to be as precise as possible, without the help of the construction lines. The construction lines and bare skeletal anatomic points should be kept in your head as you work. The second stage would be to overlay the sketch with construction lines to check yourself and fix asymmetry and as in the case with this drawing what they call "backward perspective". Doing this will only help get the structural points to a precise and automatic level.
That said, indeed the best and most "academic" stage is the second one shown here, except for the dark lines at the back of the head and neck which prevent the big form from turning. Also, with a minimum of tone, the drawing at this stage has the most prominent skeletal points accented.(even though the near cheek bone and closer part of the frontal bone could use even more pulling out)
The final drawing, seems to be pushed too far in the shadows, and most of the bones are lost. The far eye is darker than than the near one, and the eye sockets in general could be accented more than the eyes themselves, the nostril and the ear don't need to be so dark, the bottom of the lower jaw could be more anatomically accurate and doesn't need to be so dark so evenly whereas the chin would have sufficed etc.
I hope no one will thing that I am just bashing this drawing and this tutorial. The final drawing has many good qualities; it captures the character well, it has some very nice finish and render work (even if it's slightly misplaced). A major difference between the russian and chinese academies seems to be that the chinese drawings are a bit more tonal, sometimes in a photographic way, while the russian drawings are more analytical. I hope this was interesting for people to read even though it came out rather long. However, I might just have complicated things further.
I am just sharing some of the stuff I learned being a student at the Repin Academy for the past 6 years.
Iliya, those insights are immensely interesting and helpful. Thank you for taking the time to explain those subtle differences. You are helping to fill huge gaps in my understanding. By the way, the dividing line between the light and shade has several names in English including the bedbug line, terminator, shadow line, Apelles's line, and sometimes the core shadow.
I'm glad I could be of help, James. If there are any questions that I might know the answers too concerning the russian academic tradition, please ask away.
I though it was called the terminator line but wasn't sure. But I think I like "bedbug line" the best. From russian a semi-direct translation into english would be "the boundary of chiaroscuro". But "Chiaroscuro" is also translated, so it becomes "the boundary of lightdark". I wonder if the whole phrase and concept came from an italian method of drawing and painting.
James and Ilya thank you for the great comments!
I wonder if Ilya could talk a little more about the Russian academic drawing method,thought prosess in observing/ drawing 3d form etc.
Thanx, Blix. You might be interested to have a look at the post I did on the Russian academic methods as explained by Sergey Chubirko, who teaches in Florence.
http://gurneyjourney.blogspot.com/2011/03/academic-methods-part-2-russian-art.html
Fascinating and informative!
I wonder about the time estimates though. The first step seems like it should only take 3-to-5 minutes, not 35 minutes.
Is it possible that this rough blocking-in could take that long?
Thanks James and Ilya both. A ton of great info here that is really relevant to where I'm hoping to end up. I agree wtih you James about these being separate drawings. If you look at the litte "x" shape that's created at the top of the ear in drawings 2 and 3 you can see that these and the shapes they're forming are oriented differently from drawing to drawing as well.
Does either you, James, or Ilya, have any idea what method might be used to describe the work of Nicolai Fechin? I am a huge fan of his work but I can't find much info on his working methods.
Post a Comment