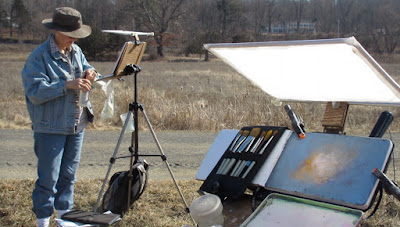
1. Allow you to stand or sit.
2. Hold your panel or sketchbook up out of your hands, so that both hands are free.
3. Position the work close to your line of sight so that you can achieve accuracy.
4. Allow easy adjustments of height, slope, and angle.
5. Diffuse the direct sunlight to get rid of glare and cast shadows.
6. Resist being blown over by the wind.
7. Set up and take down quickly, fit into a lightweight and compact bag.
8. Be easy to build from readily available materials.

After decades of tinkering—and with the generous input of you, the GJ Community here on the blog—I think we've got something that really achieves these goals.
People are calling it "The Gurney Easel," but I just call it the "sketch easel."
(Umbrella Video on YouTube) I recently headed into the workshop to build a sketch easel for Jeanette. And being the needlecraft wizard, she helped me create some light diffusers. We documented the whole process in a new Gumroad video.
It will show you exactly how to build one. If you don't have the workshop tools or skills, why not get the video for a friend who can build it for you?
(Quick-Release-Plate video on YouTube)
The video is loaded with valuable tips. For example, instead of attaching the quick release plate
Screw one of them semi-permanently into the back of your easel. Each camera and each easel gets its own plate, and the slot on the tripod is left empty when not in use (I use Velbon or Amazon tripods
 The video covers how to make both the easel and four different diffuser designs. I'll talk more about tools and materials tomorrow, and share some of your design ideas on Monday.
The HD download of "How to Make a Sketch Easel" is more than an hour long and costs only $14.95.
It's available now from Gumroad, and I'll upload it to Sellfy and Cubebrush later today.
The DVD version is available for $24.50, and it includes a slide show. The DVD is also available on Amazon


8 comments:
Bought just now, thanks for doing this James!
Cool! Man, that is genius about attaching the quick release. I have been getting asparagus rubber bands and just wrapping them tight under it. It works but it makes it a pain to get back off.
So cool. I've made a couple pochade boxes, each trying to do everything and finally decided to copy yours by photos from your post and I've had the most luck with that. I always give credit and direct people to your blog for that often. I'm glad to have something really specific to direct them to.
Even though I already built one I'll have to get this at some point to see what other advice you have. :)
Looking forward to seeing the full length video. Your workshop scenes remind me of photos I've seen of Maxfield Parrish. He had a well-equipped workshop and delighted in making a range of objects, including custom-built packing crates for his paintings.
James, any chance you might sell a diffuser?
One question not answered in the video: How is the t-nut attached to the easel back? Is it glued in the hole, or just held by friction when you screw it to the quick release plate? I'm so glad I bought the video. It has many helpful details that aren't in the blog posts.
Cora, good question. Some T-nuts come with metallic points or brads that stick into the wood. The ones with the round back can be glued in—or press-fit if the hole is the right size. Either way, the tripod screw will hold them in place.
Jim, have you flown with your sketchbook easel in carry on or checked luggage? I wondered if the strong magnets will trigger TSA screening problems. By the way, I love my new easel. Your video helped so much. You even taught me how to use Gorilla Glue and plumber's epoxy! Thanks for your answer about how to hold the tee-nut in place. I was able to press-fit it.
Hey Mr Gurney. Thank you for your motivational video. Really learned many new things. I bought your book about light and that was also a step forward. But best of all, I bought an Ikea foodplank and builded a sketch easel with your tips. Keep up the work!
Post a Comment